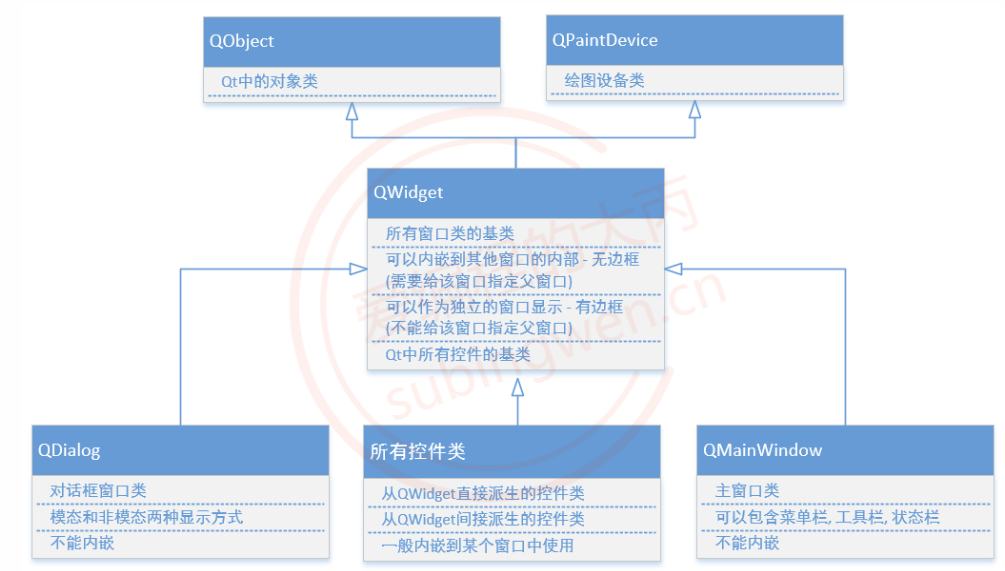
1. 基础窗口类
QWidget类是所有窗口类的父类(控件类是也属于窗口类), 并且QWidget类的父类的QObject,所有的窗口类对象只要指定了父对象, 都可以实现内存资源的自动回收。
1.1.1 设置父对象 1 2 3 4 5 6 7 8 9 QWidget::QWidget (QWidget *parent = nullptr , Qt::WindowFlags f = Qt::WindowFlags ()); void QWidget::setParent (QWidget *parent) void QWidget::setParent (QWidget *parent, Qt::WindowFlags f) QWidget *QWidget::parentWidget () const ;
1.1.2 窗口位置 1 2 3 4 5 6 7 8 9 10 11 12 QRect QWidget::frameGeometry () const ;const QRect &geometry () const void setGeometry (int x, int y, int w, int h) void setGeometry (const QRect &) void move (int x, int y) void move (const QPoint &)
窗口位置设定和位置获取的测试代码如下:
1 2 3 4 5 6 7 8 9 10 11 12 13 14 15 16 17 18 19 20 21 22 23 24 25 26 27 28 void MainWindow::on_positionBtn_clicked () QRect rect = this ->frameGeometry (); qDebug () << "左上角: " << rect.topLeft () << "右上角: " << rect.topRight () << "左下角: " << rect.bottomLeft () << "右下角: " << rect.bottomRight () << "宽度: " << rect.width () << "高度: " << rect.height (); } void MainWindow::on_geometryBtn_clicked () int x = 100 + rand () % 500 ; int y = 100 + rand () % 500 ; int width = this ->width () + 10 ; int height = this ->height () + 10 ; setGeometry (x, y, width, height); } void MainWindow::on_moveBtn_clicked () QRect rect = this ->frameGeometry (); move (rect.topLeft () + QPoint (10 , 20 )); }
1.1.3 窗口尺寸 1 2 3 4 5 6 7 8 9 10 11 12 13 14 15 16 17 18 19 20 21 22 23 24 25 26 27 28 29 30 31 32 33 34 35 36 37 38 39 40 41 42 43 44 45 46 QSize size () const void resize (int w, int h) void resize (const QSize &) QSize maximumSize () const ;QSize minimumSize () const ;void QWidget::setFixedSize (const QSize &s) void QWidget::setFixedSize (int w, int h) void setMaximumSize (const QSize &) void setMaximumSize (int maxw, int maxh) void setMinimumSize (const QSize &) void setMinimumSize (int minw, int minh) int height () const int minimumHeight () const int maximumHeight () const void QWidget::setFixedHeight (int h) void setMaximumHeight (int maxh) void setMinimumHeight (int minh) int width () const int minimumWidth () const int maximumWidth () const void QWidget::setFixedWidth (int w) void setMaximumWidth (int maxw) void setMinimumWidth (int minw)
1.1.4 窗口标题和图标 1 2 3 4 5 6 7 8 9 10 11 12 13 QIcon windowIcon () const ;QIcon::QIcon (const QString &fileName); void setWindowIcon (const QIcon &icon) QString windowTitle () const ;void setWindowTitle (const QString &)
1.1.5 信号 1 2 3 4 5 6 7 [signal] void QWidget::customContextMenuRequested (const QPoint &pos) [signal] void QWidget::windowIconChanged (const QIcon &icon) [signal] void QWidget::windowTitleChanged (const QString &title)
基于窗口策略实现右键菜单具体操作参考 Qt右键菜单的添加和使用(本章第六部分)
1.1.6 槽函数 1 2 3 4 5 6 7 8 9 10 11 12 13 14 15 16 17 18 19 20 21 22 23 24 25 26 27 [slot] bool QWidget::close () [slot] void QWidget::hide () [slot] void QWidget::show () [slot] void QWidget::showFullScreen () [slot] void QWidget::showMaximized () [slot] void QWidget::showMinimized () [slot] void QWidget::showNormal () bool QWidget::isEnabled () const [slot] void QWidget::setEnabled (bool ) [slot] void QWidget::setDisabled (bool disable) [slot] virtual void QWidget::setVisible (bool visible)
1.2 QDialog 1.2.1 常用API
对话框类是QWidget类的子类, 处理继承自父类的属性之外, 还有一些自己所特有的属性
1 2 3 4 5 6 7 8 9 10 11 12 13 14 15 16 QDialog::QDialog (QWidget *parent = nullptr , Qt::WindowFlags f = Qt::WindowFlags ()); [virtual slot] int QDialog::exec () [virtual slot] void QDialog::accept () [virtual slot] void QDialog::reject () [virtual slot] void QDialog::done (int r) [signal] void QDialog::accepted () [signal] void QDialog::rejected () [signal] void QDialog::finished (int result)
1.2.2 常用使用方法
场景介绍:
有两个窗口, 主窗口和一个对话框子窗口
对话框窗口先显示, 根据用户操作选择是否显示主窗口
1 2 3 4 5 6 7 8 9 10 11 12 13 14 15 16 void MyDialog::on_acceptBtn_clicked () this ->accept (); } void MyDialog::on_rejectBtn_clicked () this ->reject (); } void MyDialog::on_donBtn_clicked () this ->done (666 ); }
根据用户针对对话框窗口的按钮操作, 进行相应的逻辑处理。
1 2 3 4 5 6 7 8 9 10 11 12 13 14 15 16 17 18 19 20 21 22 23 24 25 MyDialog dlg; int ret = dlg.exec ();if (ret == QDialog::Accepted){ qDebug () << "accept button clicked..." ; MainWindow* w = new MainWindow; w->show (); } else if (ret == QDialog::Rejected){ qDebug () << "reject button clicked..." ; ...... ...... } else { qDebug () << "done button clicked..." ; ...... ...... }
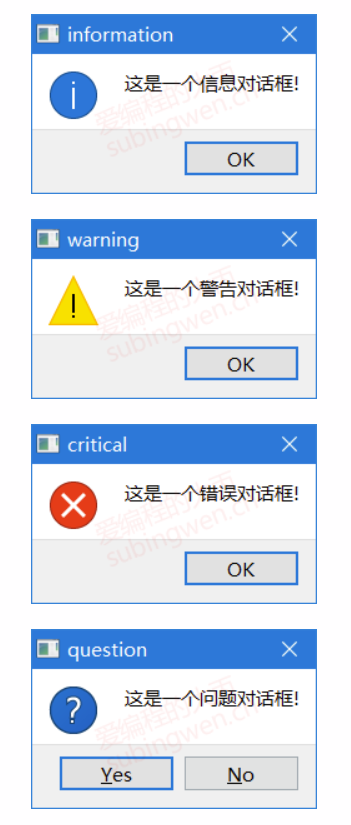
1.3 QDialog的子类 1.3.1 QMessageBox
QMessageBox 对话框类是 QDialog 类的子类
1.3.1.1 API - 静态函数 1 2 3 4 5 6 7 8 9 10 11 12 13 14 15 16 17 18 19 20 21 22 23 24 25 26 27 28 29 30 31 32 33 34 35 36 37 38 39 40 41 [static ] void QMessageBox::about (QWidget *parent, const QString &title, const QString &text) [static ] QMessageBox::StandardButton QMessageBox::information ( QWidget *parent, const QString &title, const QString &text, QMessageBox::StandardButtons buttons = Ok, QMessageBox::StandardButton defaultButton = NoButton) [static ] QMessageBox::StandardButton QMessageBox::critical ( QWidget *parent, const QString &title, const QString &text, QMessageBox::StandardButtons buttons = Ok, QMessageBox::StandardButton defaultButton = NoButton) [static ] QMessageBox::StandardButton QMessageBox::question ( QWidget *parent, const QString &title, const QString &text, QMessageBox::StandardButtons buttons = StandardButtons(Yes | No), QMessageBox::StandardButton defaultButton = NoButton) [static ] QMessageBox::StandardButton QMessageBox::warning ( QWidget *parent, const QString &title, const QString &text, QMessageBox::StandardButtons buttons = Ok, QMessageBox::StandardButton defaultButton = NoButton)
1.3.1.2 测试代码
1 2 3 4 5 6 7 8 9 10 11 12 13 14 15 16 17 void MainWindow::on_msgbox_clicked () QMessageBox::about (this , "about" , "这是一个简单的消息提示框!!!" ); QMessageBox::critical (this , "critical" , "这是一个错误对话框-critical..." ); int ret = QMessageBox::question (this , "question" , "你要保存修改的文件内容吗???" , QMessageBox::Save|QMessageBox::Cancel, QMessageBox::Cancel); if (ret == QMessageBox::Save) { QMessageBox::information (this , "information" , "恭喜你保存成功了, o(* ̄︶ ̄*)o!!!" ); } else if (ret == QMessageBox::Cancel) { QMessageBox::warning (this , "warning" , "你放弃了保存, ┭┮﹏┭┮ !!!" ); } }
得到的对话框窗口效果如下图:
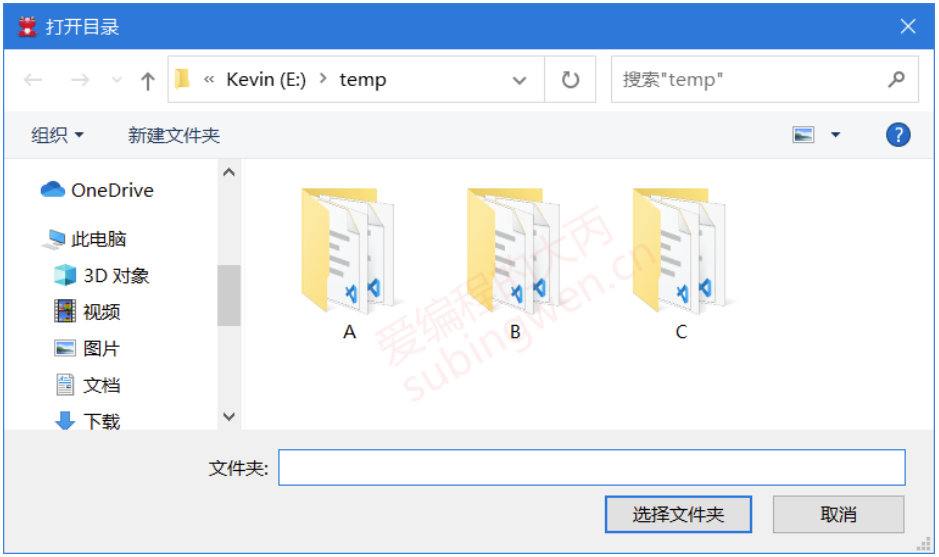
1.3.2 QFileDialog
QFileDialog 对话框类是 QDialog 类的子类
1.3.2.1 API - 静态函数 1 2 3 4 5 6 7 8 9 10 11 12 13 14 15 16 17 18 19 20 21 22 23 24 25 26 27 28 29 30 31 32 33 34 35 36 37 38 39 40 41 42 43 44 45 [static ] QString QFileDialog::getExistingDirectory ( QWidget *parent = nullptr , const QString &caption = QString(), const QString &dir = QString(), QFileDialog::Options options = ShowDirsOnly) [static ] QString QFileDialog::getOpenFileName ( QWidget *parent = nullptr , const QString &caption = QString(), const QString &dir = QString(), const QString &filter = QString(), QString *selectedFilter = nullptr , QFileDialog::Options options = Options()) [static ] QStringList QFileDialog::getOpenFileNames ( QWidget *parent = nullptr , const QString &caption = QString(), const QString &dir = QString(), const QString &filter = QString(), QString *selectedFilter = nullptr , QFileDialog::Options options = Options()) [static ] QString QFileDialog::getSaveFileName ( QWidget *parent = nullptr , const QString &caption = QString(), const QString &dir = QString(), const QString &filter = QString(), QString *selectedFilter = nullptr , QFileDialog::Options options = Options())
1.3.2.2 测试代码
1 2 3 4 5 void MainWindow::on_filedlg_clicked () QString dirName = QFileDialog::getExistingDirectory (this , "打开目录" , "e:\\temp" ); QMessageBox::information (this , "打开目录" , "您选择的目录是: " + dirName); }
对话框效果如下:
打开一个本地文件
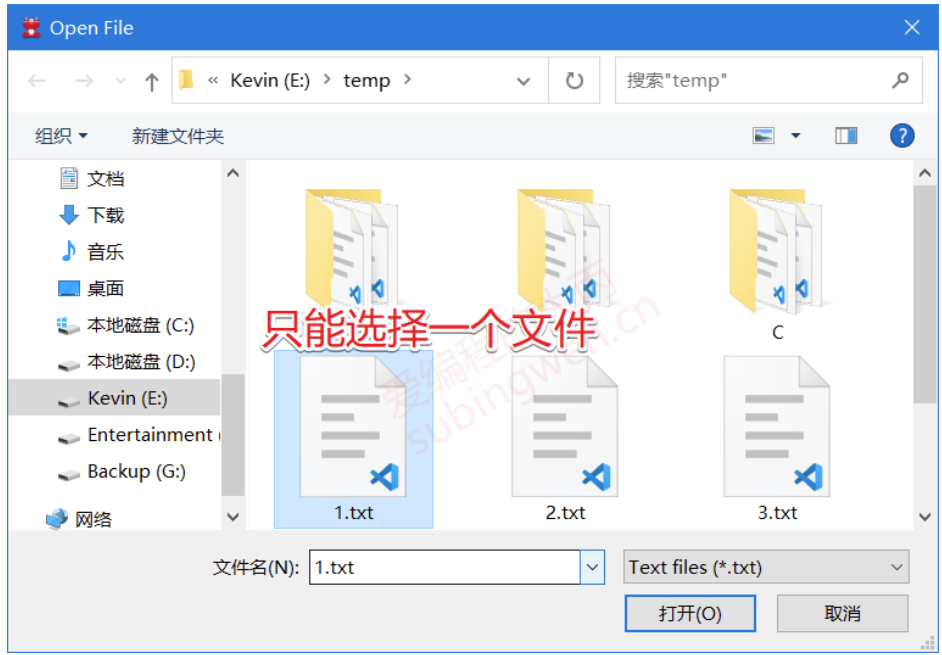
1 2 3 4 5 6 7 8 void MainWindow::on_filedlg_clicked () QString arg ("Text files (*.txt)" ) ; QString fileName = QFileDialog::getOpenFileName ( this , "Open File" , "e:\\temp" , "Images (*.png *.jpg);;Text files (*.txt)" , &arg); QMessageBox::information (this , "打开文件" , "您选择的文件是: " + fileName); }
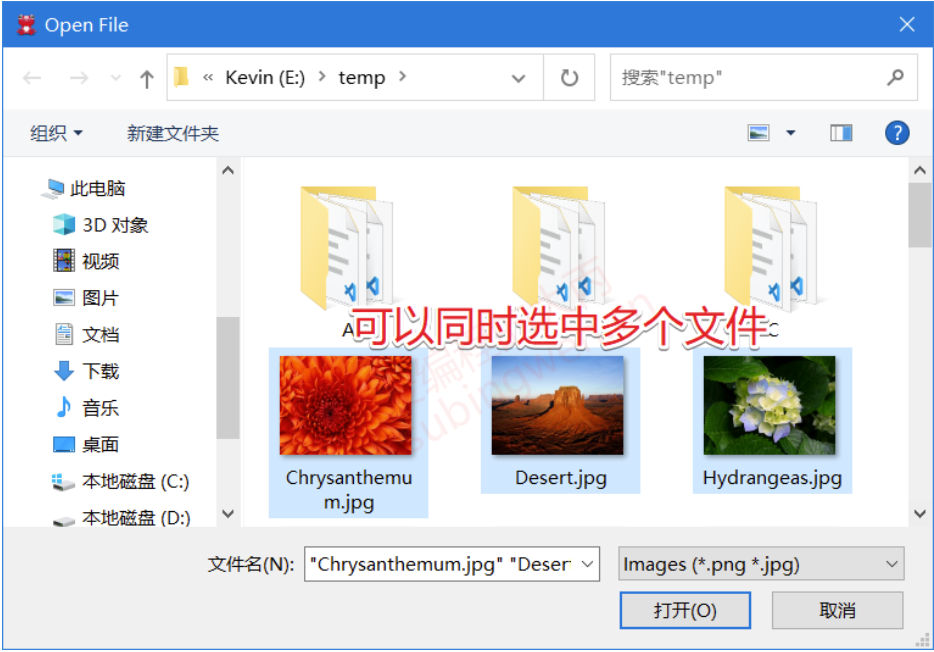
1 2 3 4 5 6 7 8 9 10 11 12 void MainWindow::on_filedlg_clicked () QStringList fileNames = QFileDialog::getOpenFileNames ( this , "Open File" , "e:\\temp" , "Images (*.png *.jpg);;Text files (*.txt)" ); QString names; for (int i=0 ; i<fileNames.size (); ++i) { names += fileNames.at (i) + " " ; } QMessageBox::information (this , "打开文件(s)" , "您选择的文件是: " + names); }
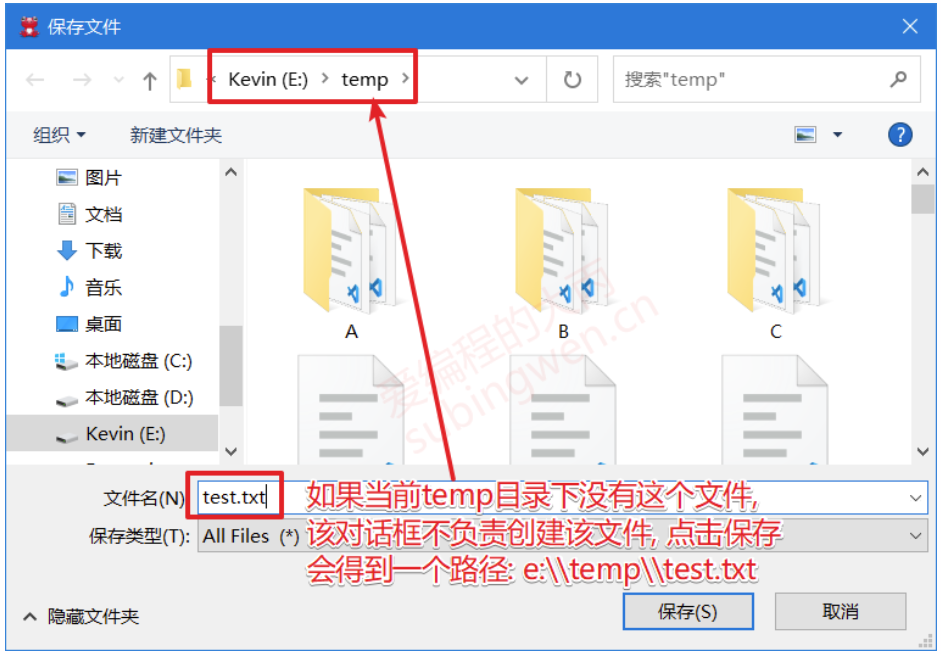
1 2 3 4 5 void MainWindow::on_filedlg_clicked () QString fileName = QFileDialog::getSaveFileName (this , "保存文件" , "e:\\temp" ); QMessageBox::information (this , "保存文件" , "您指定的保存数据的文件是: " + fileName); }
对话框效果如下:
1.3.3 QFontDialog
QFontDialog类是QDialog的子类
1.3.3.1 QFont 字体类
关于字体的属性信息, 在QT框架中被封装到了一个叫QFont的类中
1 2 3 4 5 6 7 8 9 10 11 12 13 14 15 16 17 18 19 20 21 22 23 24 25 26 27 28 29 30 31 QFont::QFont (); QFont::QFont (const QString &family, int pointSize = -1 , int weight = -1 , bool italic = false ); void QFont::setFamily (const QString &family) void QFont::setPointSize (int pointSize) void QFont::setPixelSize (int pixelSize) void QFont::setWeight (int weight) void QFont::setBold (bool enable) void QFont::setItalic (bool enable) QString QFont::family () const ; bool QFont::italic () const int QFont::pixelSize () const int QFont::pointSize () const bool QFont::bold () const int QFont::weight () const
如果一个QFont对象被创建, 并且进行了初始化, 我们可以将这个属性设置给某个窗口, 或者设置给当前应用程序对象。
1 2 3 4 5 6 7 8 9 10 11 const QWidget::QFont& font () const void QWidget::setFont (const QFont &) [static ] QFont QApplication::font () ; [static ] void QApplication::setFont (const QFont &font, const char *className = nullptr )
1.3.3.2 QFontDialog类的静态API 1 2 3 4 5 6 7 8 9 10 11 12 13 14 [static ] QFont QFontDialog::getFont ( bool *ok, const QFont &initial, QWidget *parent = nullptr , const QString &title = QString(), QFontDialog::FontDialogOptions options = FontDialogOptions()) [static ] QFont QFontDialog::getFont (bool *ok, QWidget *parent = nullptr ) ;
1.3.3.3 测试代码
通过字体对话框选择字体, 并将选择的字体设置给当前窗口
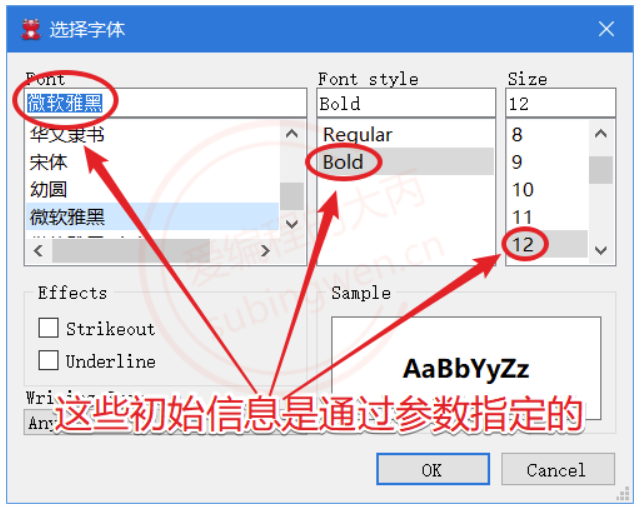
1 2 3 4 5 6 7 8 9 10 11 12 13 14 15 void MainWindow::on_fontdlg_clicked () #if 1 bool ok; QFont ft = QFontDialog::getFont ( &ok, QFont ("微软雅黑" , 12 , QFont::Bold), this , "选择字体" ); qDebug () << "ok value is: " << ok; #else QFont ft = QFontDialog::getFont (NULL ); #endif this ->setFont (ft); }
字体对话框效果展示:
1.3.4 QColorDialog
QColorDialog类是QDialog的子类
1.3.4.1 颜色类 QColor
关于颜色的属性信息, 在QT框架中被封装到了一个叫QColor的类中
1 2 3 4 5 6 7 8 9 10 11 12 13 14 15 16 17 QColor::QColor (Qt::GlobalColor color); QColor::QColor (int r, int g, int b, int a = ...); QColor::QColor (); void QColor::setRed (int red) void QColor::setGreen (int green) void QColor::setBlue (int blue) void QColor::setAlpha (int alpha) void QColor::setRgb (int r, int g, int b, int a = 255 ) int QColor::red () const int QColor::green () const int QColor::blue () const int QColor::alpha () const void QColor::getRgb (int *r, int *g, int *b, int *a = nullptr ) const
1.3.4.2 静态API函数 1 2 3 4 5 6 7 8 9 10 11 12 [static ] QColor QColorDialog::getColor ( const QColor &initial = Qt::white, QWidget *parent = nullptr , const QString &title = QString(), QColorDialog::ColorDialogOptions options = ColorDialogOptions())
1.3.4.3 测试代码
场景描述:
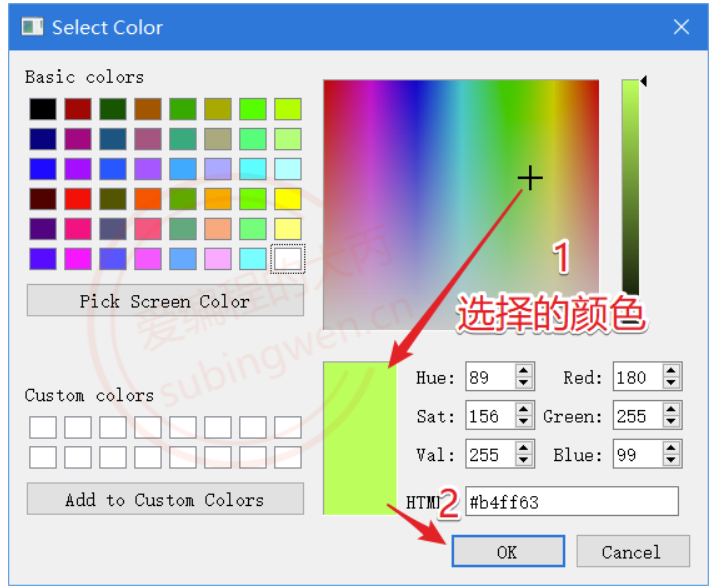
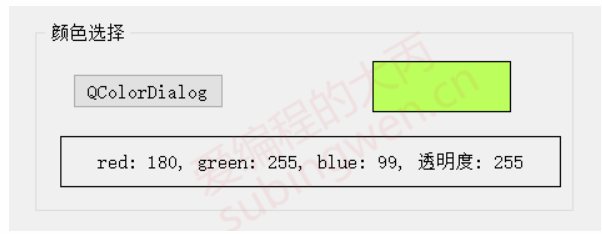
1 2 3 4 5 6 7 8 9 10 11 12 13 void MainWindow::on_colordlg_clicked () QColor color = QColorDialog::getColor (); QBrush brush (color) ; QRect rect (0 , 0 , ui->color->width(), ui->color->height()) ; QPixmap pix (rect.width(), rect.height()) ; QPainter p (&pix) ; p.fillRect (rect, brush); ui->color->setPixmap (pix); QString text = QString ("red: %1, green: %2, blue: %3, 透明度: %4" ) .arg (color.red ()).arg (color.green ()).arg (color.blue ()).arg (color.alpha ()); ui->colorlabel->setText (text); }
颜色对话框窗口效果展示
测试代码效果展示
QInputDialog类是QDialog的子类, 通过这个类我们可以得到一个输入对话框窗口
1.3.5.1 API - 静态函数 1 2 3 4 5 6 7 8 9 10 11 12 13 14 15 16 17 18 19 20 21 22 23 24 25 26 27 28 29 30 31 32 33 34 35 36 37 38 39 40 41 42 43 44 45 46 47 48 49 50 51 52 53 54 55 56 57 58 59 60 61 62 63 64 65 66 67 68 69 70 71 72 73 74 75 76 77 78 79 80 81 82 83 84 85 86 87 88 89 90 91 92 93 94 95 96 97 98 99 100 101 102 [static ] double QInputDialog::getDouble ( QWidget *parent, const QString &title, const QString &label, double value = 0 , double min = -2147483647 , double max = 2147483647 , int decimals = 1 , bool *ok = nullptr , Qt::WindowFlags flags = Qt::WindowFlags()) [static ] int QInputDialog::getInt ( QWidget *parent, const QString &title, const QString &label, int value = 0 , int min = -2147483647 , int max = 2147483647 , int step = 1 , bool *ok = nullptr , Qt::WindowFlags flags = Qt::WindowFlags()) [static ] QString QInputDialog::getItem ( QWidget *parent, const QString &title, const QString &label, const QStringList &items, int current = 0 , bool editable = true , bool *ok = nullptr , Qt::WindowFlags flags = Qt::WindowFlags(), Qt::InputMethodHints inputMethodHints = Qt::ImhNone) [static ] QString QInputDialog::getMultiLineText ( QWidget *parent, const QString &title, const QString &label, const QString &text = QString(), bool *ok = nullptr , Qt::WindowFlags flags = Qt::WindowFlags(), Qt::InputMethodHints inputMethodHints = Qt::ImhNone) [static ] QString QInputDialog::getText ( QWidget *parent, const QString &title, const QString &label, QLineEdit::EchoMode mode = QLineEdit::Normal, const QString &text = QString(), bool *ok = nullptr , Qt::WindowFlags flags = Qt::WindowFlags(), Qt::InputMethodHints inputMethodHints = Qt::ImhNone)
1.3.5.2 测试代码
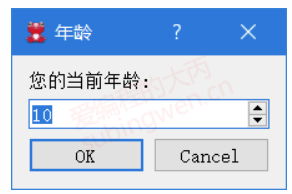
1 2 3 4 5 void MainWindow::on_inputdlg_clicked () int ret = QInputDialog::getInt (this , "年龄" , "您的当前年龄: " , 10 , 1 , 100 , 2 ); QMessageBox::information (this , "年龄" , "您的当前年龄: " + QString::number (ret)); }
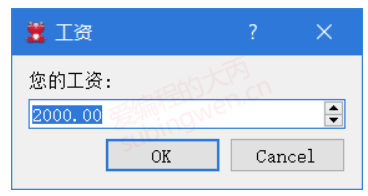
1 2 3 4 5 void MainWindow::on_inputdlg_clicked () double ret = QInputDialog::getDouble (this , "工资" , "您的工资: " , 2000 , 1000 , 6000 , 2 ); QMessageBox::information (this , "工资" , "您的当前工资: " + QString::number (ret)); }
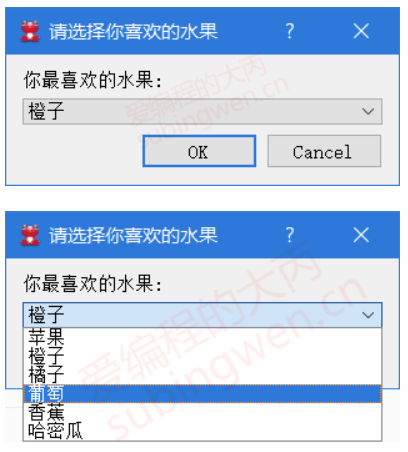
1 2 3 4 5 6 7 void MainWindow::on_inputdlg_clicked () QStringList items; items << "苹果" << "橙子" << "橘子" << "葡萄" << "香蕉" << "哈密瓜" ; QString item = QInputDialog::getItem (this , "请选择你喜欢的水果" , "你最喜欢的水果:" , items, 1 , false ); QMessageBox::information (this , "水果" , "您最喜欢的水果是: " + item); }
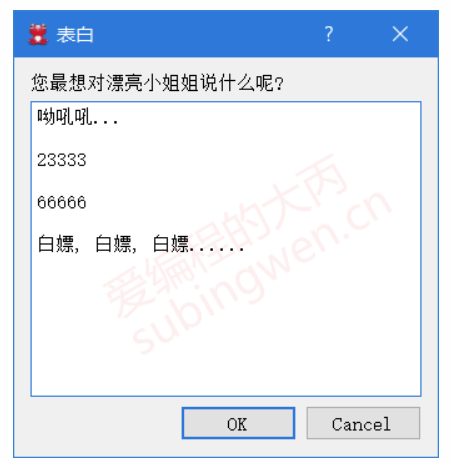
1 2 3 4 5 void MainWindow::on_inputdlg_clicked () QString info = QInputDialog::getMultiLineText (this , "表白" , "您最想对漂亮小姐姐说什么呢?" , "呦吼吼..." ); QMessageBox::information (this , "知心姐姐" , "您最想对小姐姐说: " + info); }
窗口效果展示:
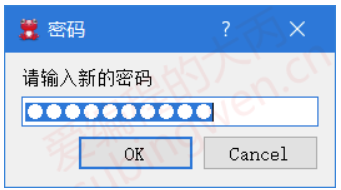
1 2 3 4 5 void MainWindow::on_inputdlg_clicked () QString text = QInputDialog::getText (this , "密码" , "请输入新的密码" , QLineEdit::Password, "helloworld" ); QMessageBox::information (this , "密码" , "您设置的密码是: " + text); }
窗口效果展示:
1.3.6 QProgressDialog
QProgressDialog类是QDialog的子类, 通过这个类我们可以得到一个带进度条的对话框窗口
1.3.6.1 常用API 1 2 3 4 5 6 7 8 9 10 11 12 13 14 15 16 17 18 19 20 21 22 23 24 25 26 27 28 29 30 31 32 33 34 35 36 37 38 39 40 41 42 43 44 45 46 47 48 49 50 51 52 53 54 55 56 57 58 59 60 61 62 63 64 65 66 67 68 69 70 71 72 73 74 75 76 77 QProgressDialog::QProgressDialog ( QWidget *parent = nullptr , Qt::WindowFlags f = Qt::WindowFlags ()); QProgressDialog::QProgressDialog ( const QString &labelText, const QString &cancelButtonText, int minimum, int maximum, QWidget *parent = nullptr , Qt::WindowFlags f = Qt::WindowFlags ()); [slot] void QProgressDialog::setCancelButtonText (const QString &cancelButtonText) QString QProgressDialog::labelText () const ;void QProgressDialog::setLabelText (const QString &text) int QProgressDialog::minimum () const void QProgressDialog::setMinimum (int minimum) int QProgressDialog::maximum () const void QProgressDialog::setMaximum (int maximum) [slot] void QProgressDialog::setRange (int minimum, int maximum) int QProgressDialog::value () const void QProgressDialog::setValue (int progress) bool QProgressDialog::autoReset () const void QProgressDialog::setAutoReset (bool reset) bool QProgressDialog::autoClose () const void QProgressDialog::setAutoClose (bool close) bool wasCanceled () const [slot] void QProgressDialog::cancel () [slot] void QProgressDialog::reset () [signal] void QProgressDialog::canceled () void QWidget::setWindowModality (Qt::WindowModality windowModality)
1.3.6.2 测试代码
场景描述:
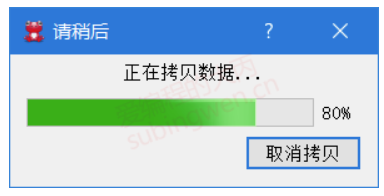
1 2 3 4 5 6 7 8 9 10 11 12 13 14 15 16 17 18 19 20 21 22 23 24 25 26 27 28 29 30 31 32 33 34 35 36 37 void MainWindow::on_progressdlg_clicked () QProgressDialog *progress = new QProgressDialog ( "正在拷贝数据..." , "取消拷贝" , 0 , 100 , this ); progress->setWindowTitle ("请稍后" ); progress->setWindowModality (Qt::WindowModal); progress->show (); static int value = 0 ; QTimer *timer = new QTimer; connect (timer, &QTimer::timeout, this , [=]() { progress->setValue (value); value++; if (value > progress->maximum ()) { timer->stop (); value = 0 ; delete progress; delete timer; } }); connect (progress, &QProgressDialog::canceled, this , [=]() { timer->stop (); value = 0 ; delete progress; delete timer; }); timer->start (50 ); }
进度窗口效果展示:
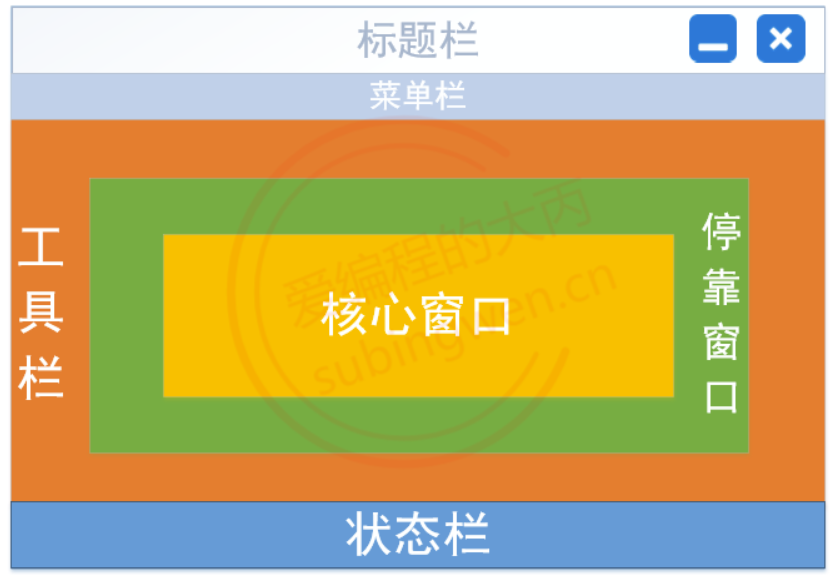
1.4 QMainWindow
QMainWindow是标准基础窗口中结构最复杂的窗口, 其组成如下:
提供了菜单栏, 工具栏, 状态栏, 停靠窗口
菜单栏: 只能有一个, 位于窗口的最上方
工具栏: 可以有多个, 默认提供了一个,窗口的上下左右都可以停靠
状态栏: 只能有一个, 位于窗口最下方
停靠窗口: 可以有多个, 默认没有提供, 窗口的上下左右都可以停靠
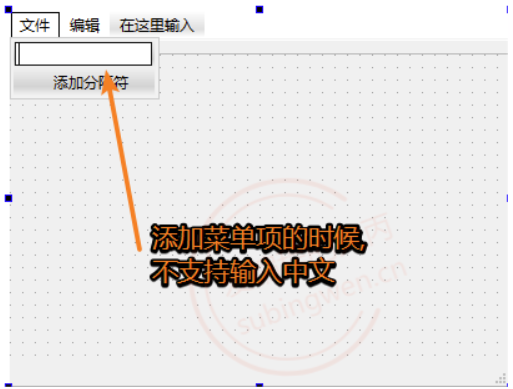
1.4.1 菜单栏
关于顶级菜单可以直接在UI窗口中双击, 直接输入文本信息即可, 对应子菜单项也可以通过先双击在输入的方式完成添加,但是这种方式不支持中文的输入。
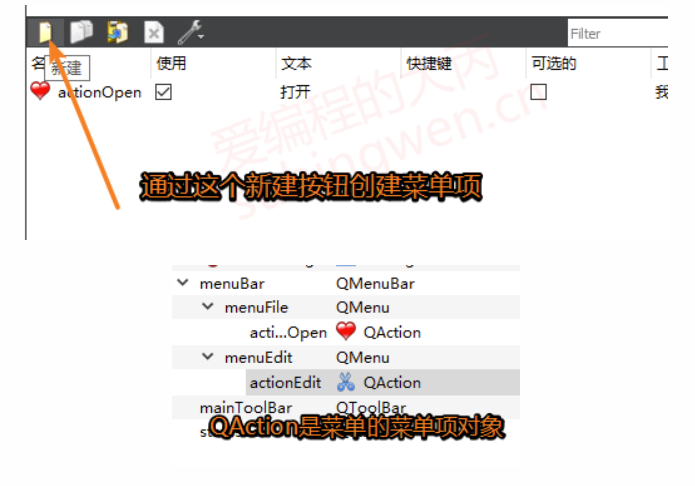
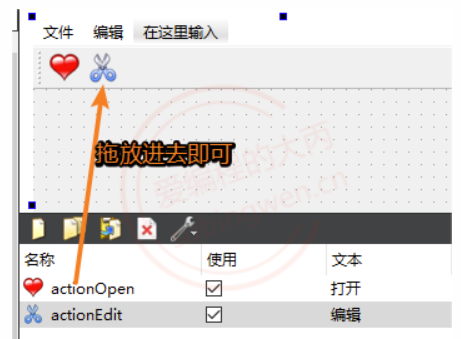
一般情况下, 我们都是先在外面创建出QAction对象, 然后再将其拖拽到某个菜单下边, 这样子菜单项的添加就完成了。
1 2 3 4 5 6 7 8 9 10 11 QAction *QMenuBar::addMenu (QMenu *menu) ;QMenu *QMenuBar::addMenu (const QString &title) ;QMenu *QMenuBar::addMenu (const QIcon &icon, const QString &title) ;QAction *QMenu::addAction (const QString &text) ;QAction *QMenu::addAction (const QIcon &icon, const QString &text) ;QAction *QMenu::addSeparator () ;
单击菜单项, 该对象会发出一个信号
1 2 [signal] void QAction::triggered (bool checked = false )
示例代码
1 2 3 4 5 connect (ui->save_action, &QAction::triggered, this , [=](){ QMessageBox::information (this , "Triggered" , "我是菜单项, 你不要调戏我..." ); });
1.4.2 工具栏 1.4.2.1 添加工具按钮
窗口中的工具栏我们经常见到, 并不会为此感到陌生, 如何往工具栏中添加工具按钮?
方式1:先创建QAction对象, 然后拖拽到工具栏中, 和添加菜单项的方式相同
方式2:如果不通过UI界面直接操作,那么就需要调用相关的API函数了
1 2 3 4 5 6 7 8 9 10 11 12 13 14 15 16 void QMainWindow::addToolBar (Qt::ToolBarArea area, QToolBar *toolbar) void QMainWindow::addToolBar (QToolBar *toolbar) QToolBar *QMainWindow::addToolBar (const QString &title) ;QAction *QToolBar::addWidget (QWidget *widget) ;QAction *QToolBar::addAction (const QString &text) ;QAction *QToolBar::addAction (const QIcon &icon, const QString &text) ;QAction *QToolBar::addSeparator ()
通过代码的方式对工具栏进行操作
1 2 3 4 5 6 7 8 9 10 11 12 13 14 15 16 17 18 19 MainWindow::MainWindow (QWidget *parent) : QMainWindow (parent) , ui (new Ui::MainWindow) { ui->setupUi (this ); QToolBar* toolbar = new QToolBar ("toolbar" ); this ->addToolBar (Qt::LeftToolBarArea, toolbar); ui->toolBar->addWidget (new QPushButton ("搜索" )); QLineEdit* edit = new QLineEdit; edit->setMaximumWidth (200 ); edit->setFixedWidth (100 ); ui->toolBar->addWidget (edit); ui->toolBar->addAction (QIcon (":/er-dog" ), "二狗子" ); }
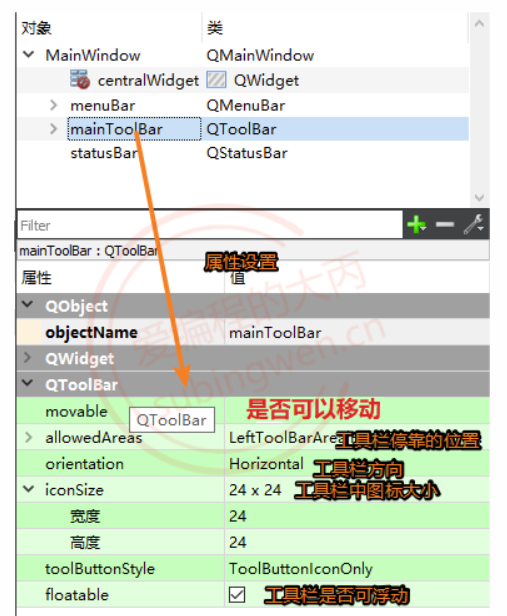
1.4.2.2 工具栏的属性设置
在UI窗口的树状列表中, 找到工具栏节点, 就可以得到工具栏的属性设置面板了
在Qt控件的属性窗口中对应了一些属性, 这些属性大部分都应了一个设置函数
在对应的类中函数名叫什么?
某些属性没有对应的函数, 只能在属性窗口中设置
1.4.3 状态栏
一般情况下, 需要在状态栏中添加某些控件, 显示某些属性, 用最多的就是添加标签 QLabel
1 2 3 4 5 void QStatusBar::addWidget (QWidget *widget, int stretch = 0 ) [slot] void QStatusBar::clearMessage () [slot] void QStatusBar::showMessage (const QString &message, int timeout = 0 )
1 2 3 4 5 6 7 8 9 10 11 12 13 14 MainWindow::MainWindow (QWidget *parent) : QMainWindow (parent) , ui (new Ui::MainWindow) { ui->setupUi (this ); QPushButton* button = new QPushButton ("按钮" ); ui->statusBar->addWidget (button); QLabel* label = new QLabel ("hello,world" ); ui->statusBar->addWidget (label); }
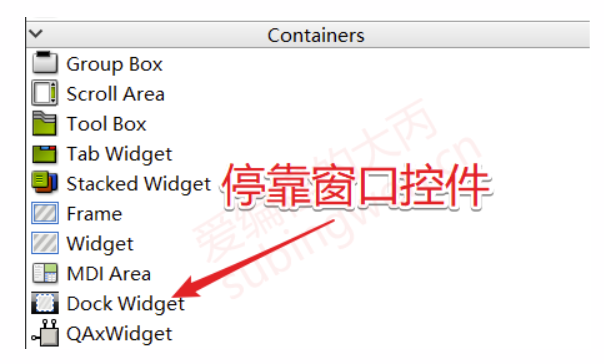
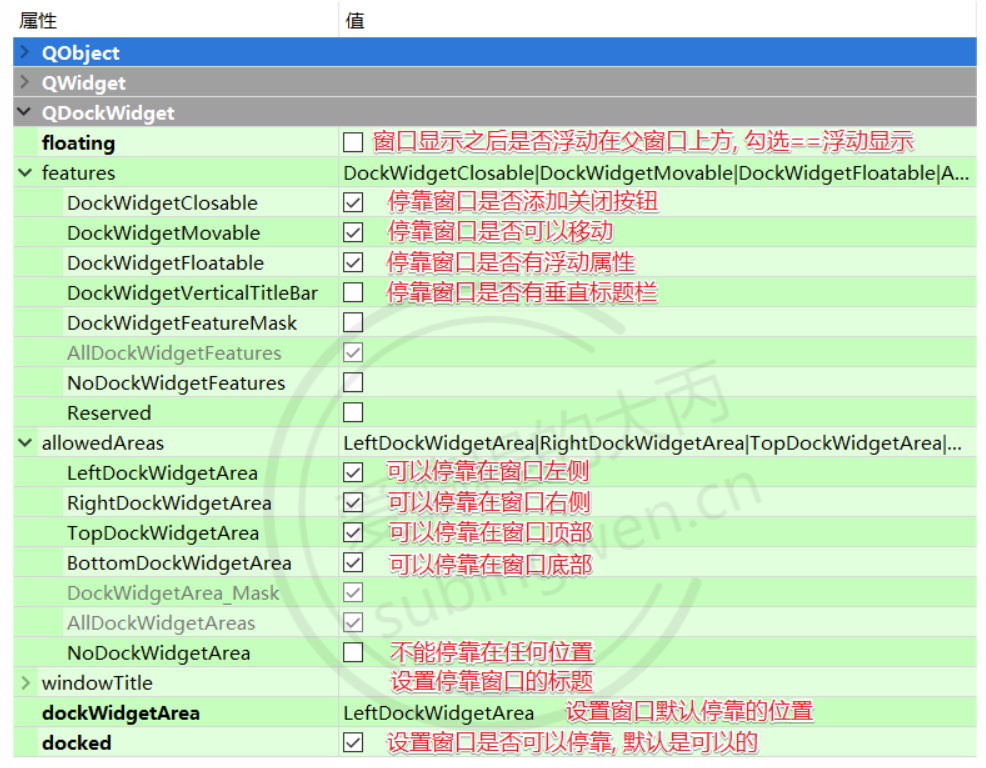
1.4.4 停靠窗口
停靠窗口可以通过鼠标拖动停靠到窗口的上、下、左、右,或者浮动在窗口上方。如果在非QMainWindow类型的窗口中添加了停靠窗口,那么这个窗口是不能移动和浮动的。
停靠窗口也有一个属性面板, 我们可以在其对应属性面板中直接进行设置和修改相关属性。
1.5 资源文件 .qrc
资源文件顾名思义就是一个存储资源的文件,在Qt中引入资源文件好处在于他能提高应用程序的部署效率并且减少一些错误的发生。在程序编译过程中,添加到资源文件中的文件也会以二进制的形式被打包到可执行程序中,这样这些资源就永远和可执行程序捆绑到一起了,不会出现加载资源却找不到的问题。
1 2 3 4 5 6 7 8 9 QIcon::QIcon (const QString &fileName); void setWindowIcon (const QIcon &icon) setWindowIcon (QIcon ("d:\\pic\\1.ico" ));
我们可以使用资源文件解决上述的弊端, 这样发布应用程序的时候直接发布exe就可以, 不需要再额外提供图片了。
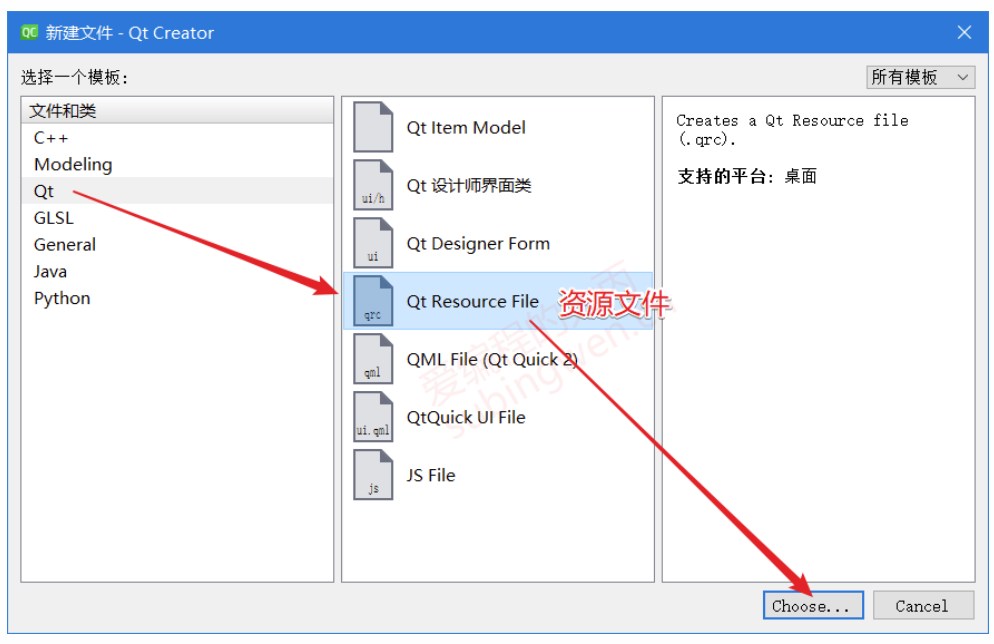
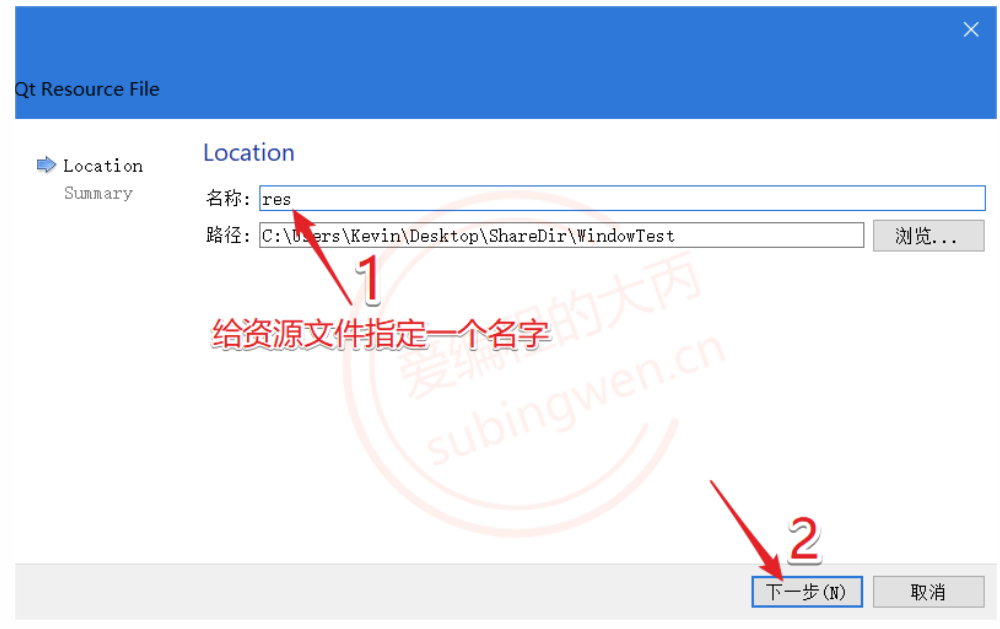
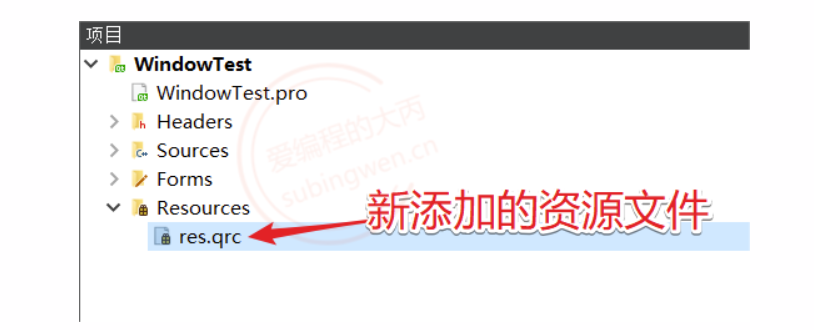
介绍一下关于资源文件的创建步骤:
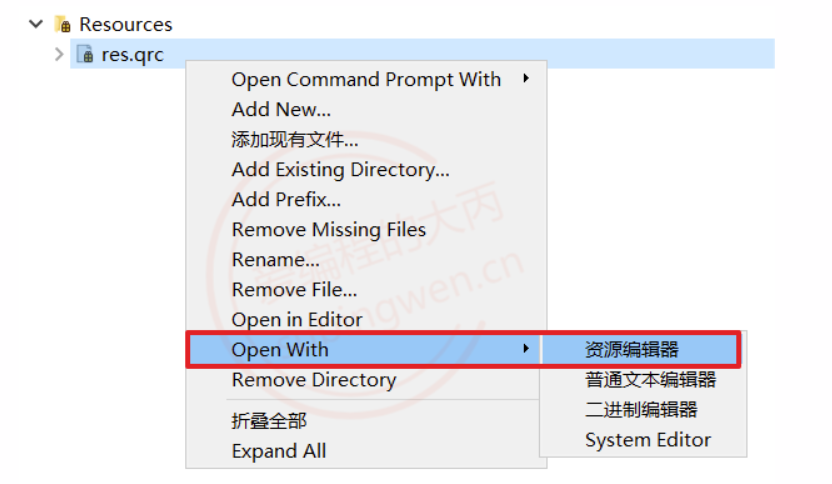
资源文件添加完毕之后, 继续给大家介绍资源文件的使用
使用资源编辑器打开资源文件
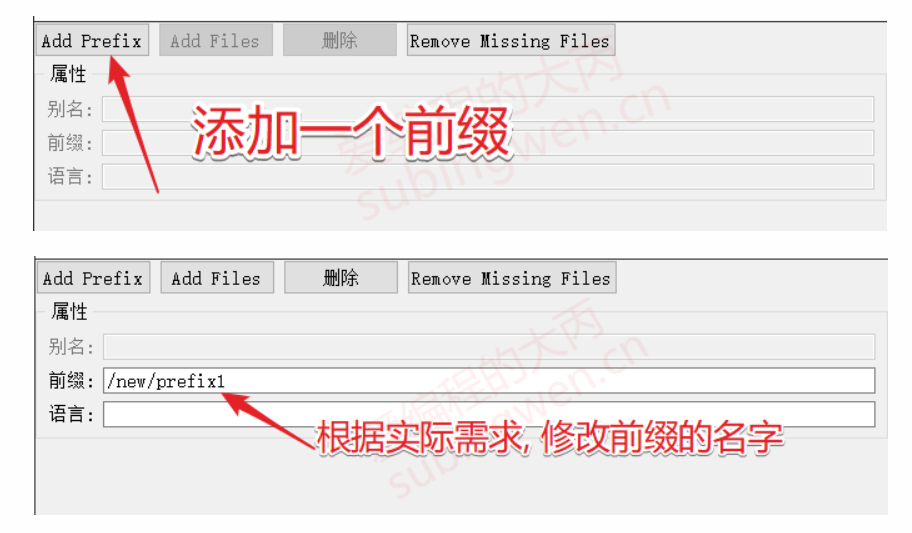
给资源添加前缀
一个资源文件中可以添加多个前缀, 前缀就是添加的资源在资源文件中的路径, 前缀根据实际需求制定即可, 路径以/开头
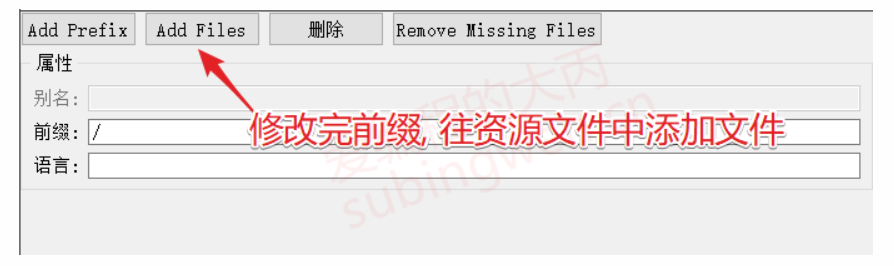
添加文件
前缀添加完毕, 就可以在某个前缀下边添加相关的资源了。
弹出以文件选择对话框, 选择资源文件
资源文件放到什么地方?
放到和 项目文件 .pro 同一级目录或者更深的目录中错误的做法: 将资源文件放到 .pro文件的上级目录, 这样资源文件无法被加载到
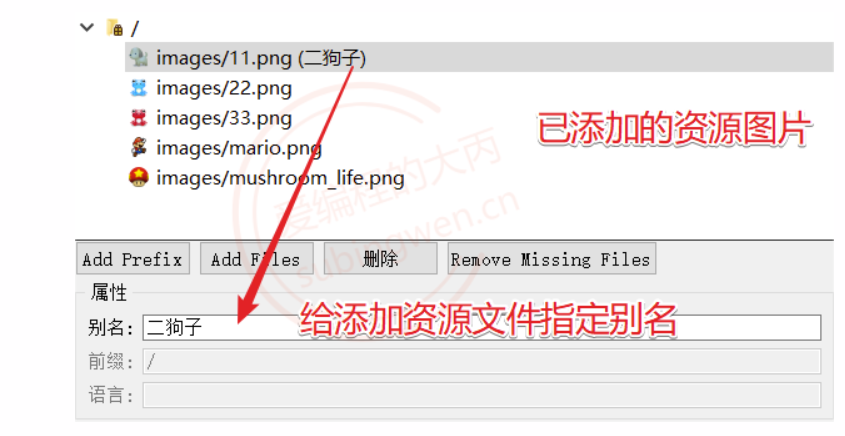
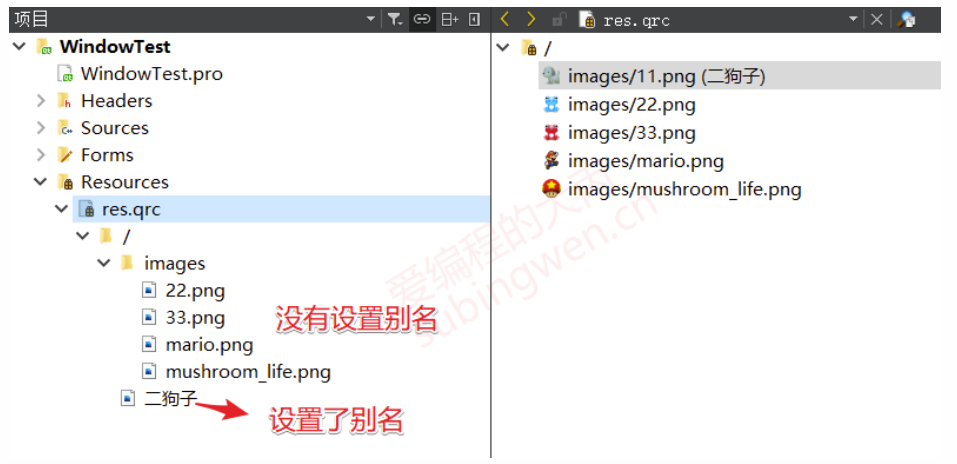
可以给添加的资源文件设置别名, 设置别名之后原来的名字就不能使用了
温馨提示:
在高版本的QtCreator中, 资源文件名字或者别名不支持中文
如果设置了中文会出现编译会报错
在此只是演示, 使用过程中需要额外注意该问题
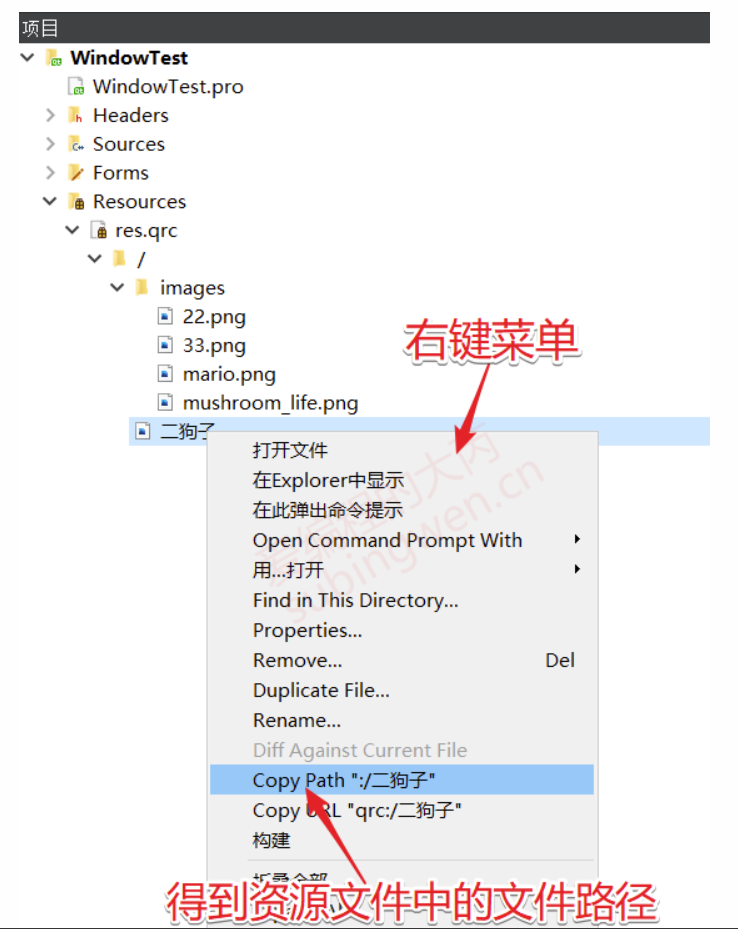
如何在程序中使用资源文件中的图片
将项目树中的资源文件节点展开
找到需要使用的资源图片节点, 鼠标右键, 弹出的菜单中选择Copy Path ...
1.6 在Qt窗口中添加右键菜单 如果想要在某一窗口中显示右键菜单, 其处理方式大体上有两种鼠标事件实现和基于窗口的菜单策略实现。
1.6.1 基于鼠标事件实现 1.6.1.1 实现思路
使用这种方式实现右键菜单的显示需要使用事件处理器函数, 在Qt中这类函数都是回调函数,
实现步骤如下:
在当前窗口类中重写鼠标操作相关的的事件处理器函数,有两个可以选择
1 2 3 4 [virtual protected ] void QWidget::mousePressEvent (QMouseEvent *event) [virtual protected ] void QWidget::mouseReleaseEvent (QMouseEvent *event)
在数据表事件处理器函数内部判断是否按下了鼠标右键
如果按下了鼠标右键创建菜单对象(也可以提前先创建处理), 并将其显示出来
1 2 3 4 QAction *QMenu::exec (const QPoint &p, QAction *action = nullptr ) ;
1.6.1.2 代码实现
在头文件中添加要重写的鼠标事件处理器函数声明, 这里使用的是 mousePressEvent()
1 2 3 4 5 6 7 8 9 10 11 12 13 14 15 16 17 18 19 20 21 22 #include <QMainWindow> namespace Ui {class MainWindow ;} class MainWindow : public QMainWindow{ Q_OBJECT public : explicit MainWindow (QWidget *parent = 0 ) ~MainWindow (); protected : void mousePressEvent (QMouseEvent *event) private : Ui::MainWindow *ui; };
在源文件中重写从父类继承的虚函数mousePressEvent()
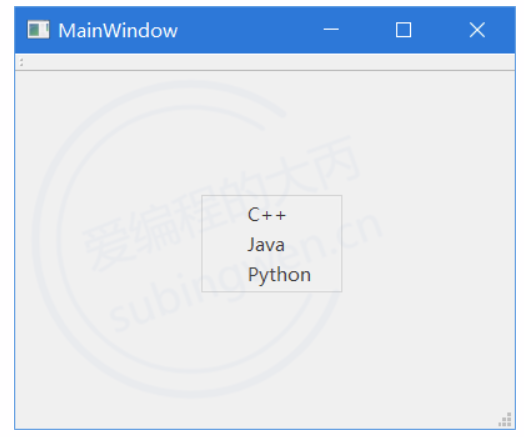
1 2 3 4 5 6 7 8 9 10 11 12 13 14 15 16 17 18 void MainWindow::mousePressEvent (QMouseEvent *event) if (event->button () == Qt::RightButton) { QMenu menu; QAction* act = menu.addAction ("C++" ); connect (act, &QAction::triggered, this , [=]() { QMessageBox::information (this , "title" , "您选择的是C++..." ); }); menu.addAction ("Java" ); menu.addAction ("Python" ); menu.exec (QCursor::pos ()); } }
1.6.2 基于窗口的菜单策略实现
这种方式是使用 Qt 中 QWidget 类中的右键菜单函数QWidget::setContextMenuPolicy(Qt::ContextMenuPolicy policy) 来实现,
这个函数的函数原型如下:
1 2 3 4 5 6 7 8 void QWidget::setContextMenuPolicy (Qt::ContextMenuPolicy policy) 参数: - Qt::NoContextMenu --> 不能实现右键菜单 - Qt::PreventContextMenu --> 不能实现右键菜单 - Qt::DefaultContextMenu --> 基于事件处理器函数 QWidget::contextMenuEvent () 实现 - Qt::ActionsContextMenu --> 添加到当前窗口中所有 QAction 都会作为右键菜单项显示出来 - Qt::CustomContextMenu --> 基于 QWidget::customContextMenuRequested () 信号实现
使用这个策略实现右键菜单, 需要借助窗口类从父类继承的虚函QWidget::contextMenuEvent()并重写它来实现。
1 2 3 4 5 6 7 8 9 10 11 12 13 14 15 16 17 18 19 20 21 22 23 #include <QMainWindow> namespace Ui {class MainWindow ;} class MainWindow : public QMainWindow{ Q_OBJECT public : explicit MainWindow (QWidget *parent = 0 ) ~MainWindow (); protected : void contextMenuEvent (QContextMenuEvent *event) private : Ui::MainWindow *ui; };
1 2 3 4 5 6 7 8 9 10 11 MainWindow::MainWindow (QWidget *parent) : QMainWindow (parent), ui (new Ui::MainWindow) { ui->setupUi (this ); setContextMenuPolicy (Qt::DefaultContextMenu); }
第三步在这个窗口类的源文件中重写事件处理器函数 contextMenuEvent()
1 2 3 4 5 6 7 8 9 10 11 12 13 14 void MainWindow::contextMenuEvent (QContextMenuEvent *event) QMenu menu; QAction* act = menu.addAction ("C++" ); connect (act, &QAction::triggered, this , [=]() { QMessageBox::information (this , "title" , "您选择的是C++..." ); }); menu.addAction ("Java" ); menu.addAction ("Python" ); menu.exec (QCursor::pos ()); }
使用这个策略实现右键菜单, 是最简单的一种, 我们只需要创建一些 QAction 类型的对象并且将他们添加到当前的窗口中,当我们在窗口中点击鼠标右键这些QAction类型的菜单项就可以显示出来了。
1 2 3 4 5 6 7 8 9 10 11 12 13 14 15 16 17 18 19 20 21 22 MainWindow::MainWindow (QWidget *parent) : QMainWindow (parent), ui (new Ui::MainWindow) { ui->setupUi (this ); setContextMenuPolicy (Qt::ActionsContextMenu); QAction* act1 = new QAction ("C++" ); QAction* act2 = new QAction ("Java" ); QAction* act3 = new QAction ("Python" ); this ->addAction (act1); this ->addAction (act2); this ->addAction (act3); connect (act1, &QAction::triggered, this , [=]() { QMessageBox::information (this , "title" , "您选择的是C++..." ); }); }
使用这个策略实现右键菜单, 当点击鼠标右键,窗口会产生一个 QWidget::customContextMenuRequested()信号
来看一下这个信号的函数原型:
1 2 [signal] void QWidget::customContextMenuRequested (const QPoint &pos)
代码实现也比较简单, 如下所示:
1 2 3 4 5 6 7 8 9 10 11 12 13 14 15 16 17 18 19 20 21 22 23 24 25 26 27 28 29 MainWindow::MainWindow (QWidget *parent) : QMainWindow (parent), ui (new Ui::MainWindow) { ui->setupUi (this ); this ->setContextMenuPolicy (Qt::CustomContextMenu); connect (this , &MainWindow::customContextMenuRequested, this , [=](const QPoint &pos) { QMenu menu; QAction* act = menu.addAction ("C++" ); connect (act, &QAction::triggered, this , [=]() { QMessageBox::information (this , "title" , "您选择的是C++..." ); }); menu.addAction ("Java" ); menu.addAction ("Python" ); QPoint newpt = this ->mapToGlobal (pos); menu.exec (newpt); }); }
在上边的程序中, 我们通过窗口发射的信号得到了一个坐标类型的参数这个坐标是当前窗口的窗口坐标, 不是屏幕坐标,显示右键菜单需要使用屏幕坐标。
对应这个坐标的处理可以有两种方式:
弃用,选择使用 QCursor::pos() 得到光标在屏幕的坐标位置
坐标转换, 将窗口坐标转换为屏幕坐标, 这里用到了一个函数 mapToGlobal
1 2 QPoint QWidget::mapToGlobal (const QPoint &pos) const ;
不管使用以上哪种方式显示右键菜单, 显示出来之后的效果是一样的
最后如果想要让自己的右键菜单项显示图标, 可以调用这个函数
1 2 3 4 QAction *QMenu::addAction (const QString &text) ;QAction *QMenu::addAction (const QIcon &icon, const QString &text) ;
2. 窗口布局 2.1 布局的样式
Qt窗口布局是指将多个子窗口按照某种排列方式将其全部展示到对应的父窗口中的一种处理方式
在Qt中常用的布局样式有三种,分别是:
布局样式
描述
行数
列数
水平布局
布局中的所有的控件水平排列
1行
N列 (N>=1)
垂直布局
布局中的所有的控件垂直排列
N行 (N>=1)
1列
网格(栅格)布局
布局中的所有的控件垂直+水平排列
N行 (N>=1)
N列 (N>=1)
1 2 3 4 5 6 7 8 9 10 11 有问有答: 1. 控件的位置可以通过坐标指定, 为什么还要使用布局? - 坐标指定的位置是固定的, 当窗口大小发生改变, 子窗口位置不会变化 - 使用坐标指定子窗口位置, 这个控件可能会被其他控件覆盖导致无法显示出来 - 使用布局的方式可以完美解决以上的问题 - 一般在制作窗口的过程中都是给子控件进行布局, 而不是指定固定坐标位置 2. 布局有局限性吗, 窗口结构复杂如何解决呢? - 没有局限性, 并且布局的使用是非常灵活的 - 各种布局是可以无限嵌套使用的, 这样就可以制作成非常复杂的窗口了 - 思路是这样的: 给窗口设置布局, 在布局中添加窗口, 子窗口中再设置布局, 在子窗口布局中再次添加窗口, ......(无限循环)
2.2 在UI窗口中设置布局
在UI窗口中进行布局的设置一共有两种处理方式
2.2.1 方式1
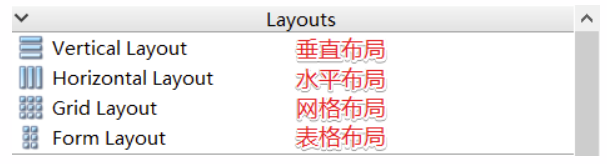
第一种方式是使用Qt提供的布局, 从工具箱中找到相关的布局, 然后将其拖拽到UI窗口中
将相应的控件放入到布局对应的红色框内部, 这些控件就按照布局的样式自动排列到一起了,是不是很方便,赶紧自己操作起来感受一下吧。
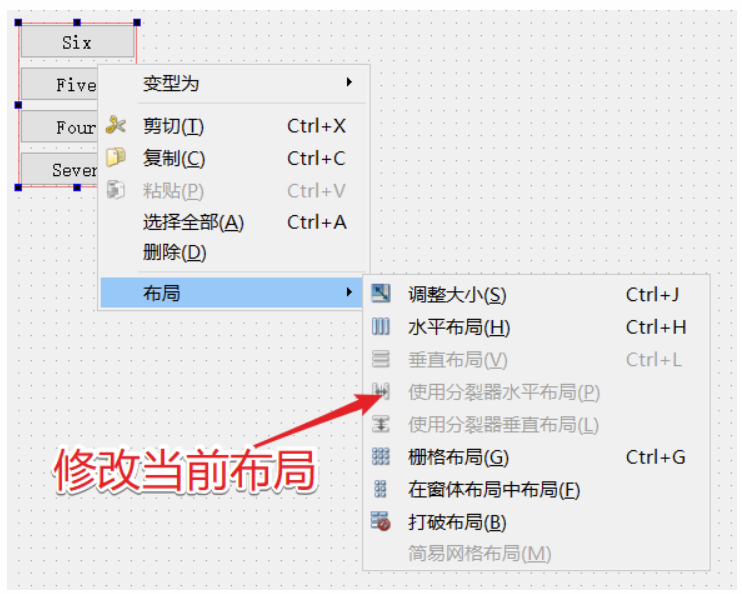
除此之外, 我们也可以修改当前布局, 需要先选中当前布局, 然后鼠标右键, 在右键菜单中找布局在其子菜单项中选择其他布局即可
2.2.2 方式2
第二种方式是直接在父窗口中对子部件进行布局, 如果窗口结构很复杂需要嵌套, 那么就需要先将这些子部件放到一个容器类型的窗口中,然后再对这个容器类型的窗口进行布局操作。
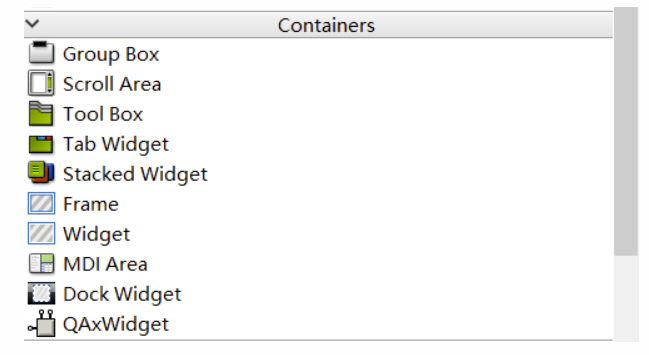
首先需要从工具栏中拖拽一个容器类型的窗口到UI界面上
一般首选QWidget原因是简单, 并且窗口显示之后看不到任何痕迹
将要布局的子控件放到这个QWidget中
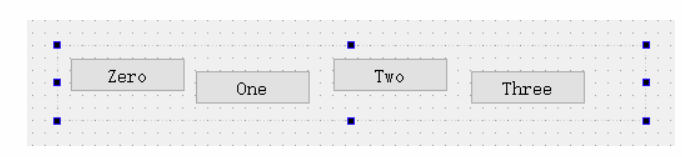
控件拖放过程中无需在意位置和是否对齐, 没有布局之前显示杂乱无序是正常现象。
对这个QWidget进行布局
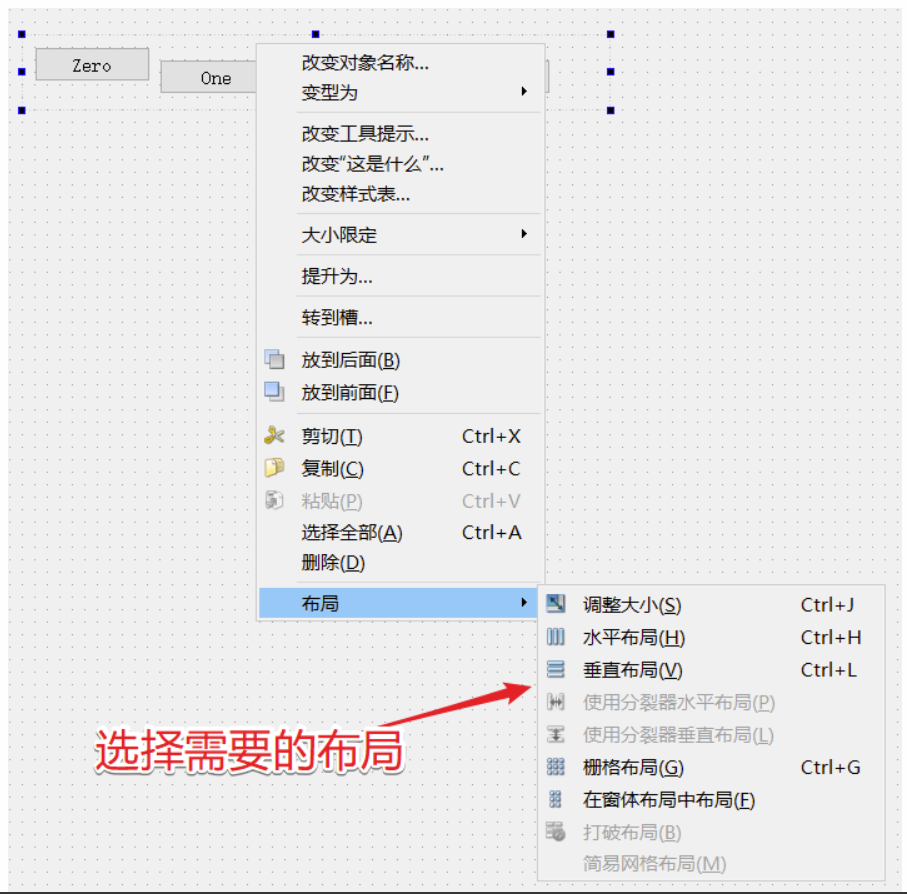
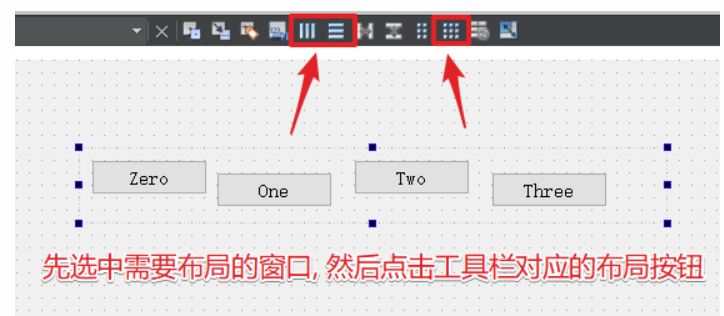
首选选中这个存储子部件的父容器窗口, 然后鼠标右键, 在右键菜单中找布局, 通过其子菜单就可以选择需要的布局方式了。布局之后所有的子部件就能够按照对应样式排列了(如果是网格布局, 有时候需要使用鼠标调节一下)
也可以通过窗口上方工具栏提供的布局按钮进行窗口布局
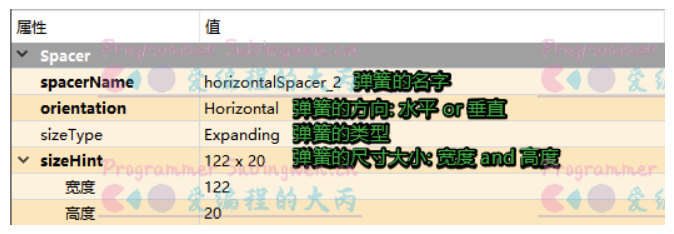
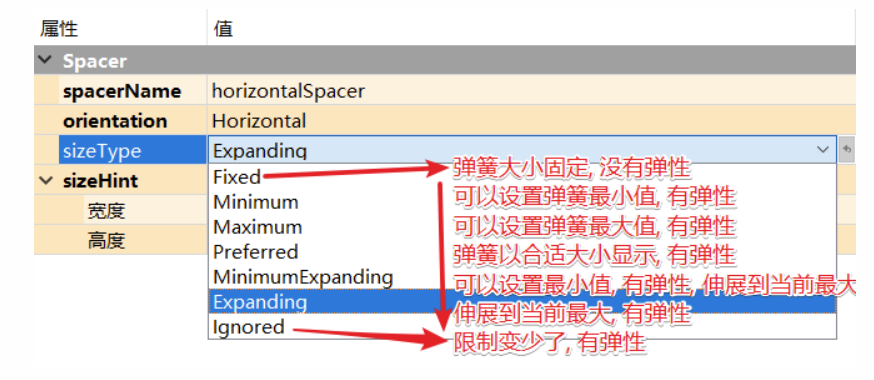
2.2.3 弹簧的使用 弹簧也有对应的属性可以设置, 具体属性如下图所示:
关于弹簧的sizeType属性, 有很多选项, 一般常用的只有两个:Fixed: 得到一个固定大小的弹簧Expanding: 得到一个可伸缩的弹簧, 默认弹簧撑到最大
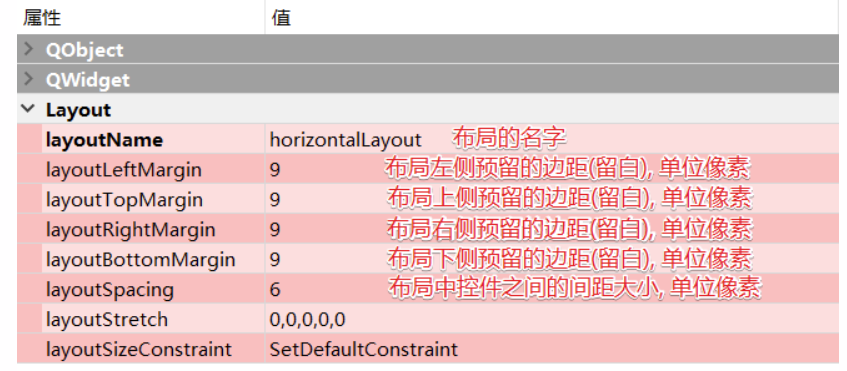
2.2.4 布局属性设置
当我们给窗口设置了布局之后, 选中当前窗口, 就可以看到在其对应的属性窗口中除了有窗口属性, 还有一个布局属性
介绍一下这些属性:
2.2.5 布局的注意事项
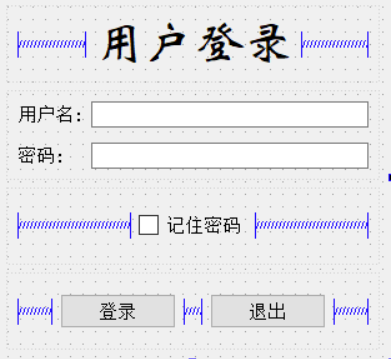
通过UI编辑窗口的树状列表我们可以对所有窗口的布局进行检查, 如果发现某个窗口没有布局, 一定要对其进行设置如果某个窗口没有进行布局, 那么当这个窗口显示出来之后里边的子部件就可能无法被显示出来
一个简单的登录窗口
2.3 通过API设置布局
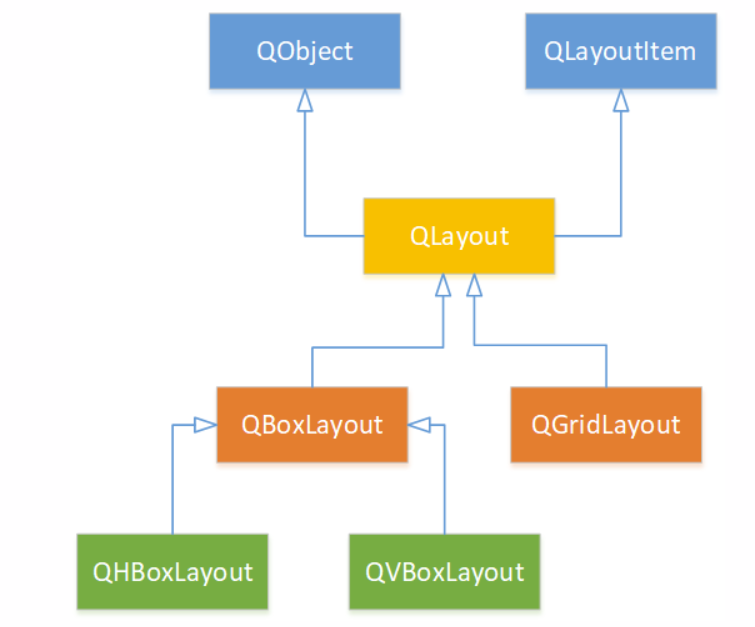
在QT中, 布局也有对应的类, 布局类之间的关系如下:
在上图中的布局类虽然很多, 常用的布局类有三个, 就前边给大家介绍的三种布局, 对应关系如下:
布局样式
类名
水平布局
QHBoxLayout
垂直布局
QVBoxLayout
网格(栅格)布局
QGridLayout
一般我们不使用这些布局类对窗口进行布局
2.3.1 QLayout 1 2 3 4 5 6 7 8 void QLayout::addWidget (QWidget *w) void QLayout::removeWidget (QWidget *widget) void QLayout::setContentsMargins (int left, int top, int right, int bottom) void setSpacing (int )
2.3.2 QHBoxLayout
这个类中的常用API都是从基类继承过来的
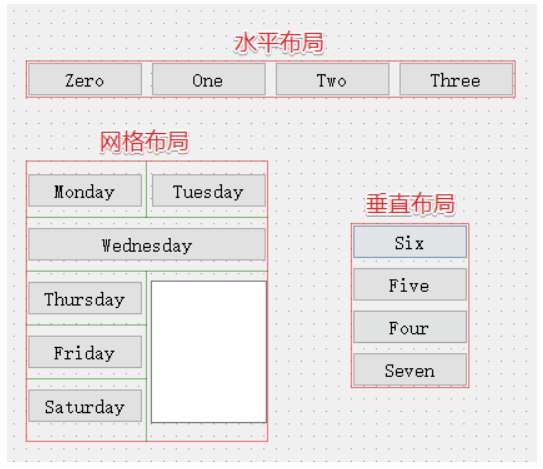
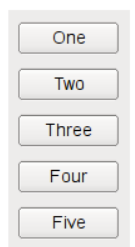
1 2 3 4 5 6 7 8 9 10 11 12 13 14 15 16 17 18 19 20 21 22 QWidget *window = new QWidget; QPushButton *button1 = new QPushButton ("One" ); QPushButton *button2 = new QPushButton ("Two" ); QPushButton *button3 = new QPushButton ("Three" ); QPushButton *button4 = new QPushButton ("Four" ); QPushButton *button5 = new QPushButton ("Five" ); QHBoxLayout *layout = new QHBoxLayout; layout->addWidget (button1); layout->addWidget (button2); layout->addWidget (button3); layout->addWidget (button4); layout->addWidget (button5); window->setLayout (layout); window->show ();
代码效果展示:
2.3.3 QVBoxLayout
这个类中的常用API都是从基类继承过来的
1 2 3 4 5 6 7 8 9 10 11 12 13 14 15 16 17 18 19 20 21 22 QWidget *window = new QWidget; QPushButton *button1 = new QPushButton ("One" ); QPushButton *button2 = new QPushButton ("Two" ); QPushButton *button3 = new QPushButton ("Three" ); QPushButton *button4 = new QPushButton ("Four" ); QPushButton *button5 = new QPushButton ("Five" ); QVBoxLayout *layout = new QVBoxLayout; layout->addWidget (button1); layout->addWidget (button2); layout->addWidget (button3); layout->addWidget (button4); layout->addWidget (button5); window->setLayout (layout); window->show ();
代码效果展示:
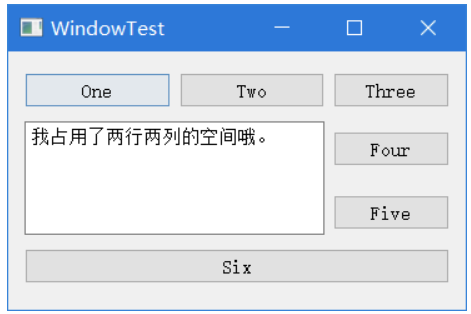
2.3.4 QGridLayout 1 2 3 4 5 6 7 8 9 10 11 12 13 14 15 16 17 18 19 20 21 22 23 24 25 26 27 28 29 30 31 32 33 34 35 36 37 38 QGridLayout::QGridLayout (); QGridLayout::QGridLayout (QWidget *parent); void QGridLayout::addWidget ( QWidget *widget, int row, int column, Qt::Alignment alignment = Qt::Alignment()) void QGridLayout::addWidget ( QWidget *widget, int fromRow, int fromColumn, int rowSpan, int columnSpan, Qt::Alignment alignment = Qt::Alignment()) void QGridLayout::setColumnMinimumWidth (int column, int minSize) void QGridLayout::setHorizontalSpacing (int spacing) void QGridLayout::setVerticalSpacing (int spacing)
测试代码如下:
1 2 3 4 5 6 7 8 9 10 11 12 13 14 15 16 17 18 19 20 21 22 23 24 25 26 27 28 29 30 31 32 33 QWidget* window = new QWidget; QPushButton *button1 = new QPushButton ("One" ); QPushButton *button2 = new QPushButton ("Two" ); QPushButton *button3 = new QPushButton ("Three" ); QPushButton *button4 = new QPushButton ("Four" ); QPushButton *button5 = new QPushButton ("Five" ); QPushButton *button6 = new QPushButton ("Six" ); QTextEdit* txedit = new QTextEdit; txedit->setText ("我占用了两行两列的空间哦。" ); QGridLayout* layout = new QGridLayout; layout->addWidget (button1, 0 , 0 ); layout->addWidget (button2, 0 , 1 ); layout->addWidget (button3, 0 , 2 ); layout->addWidget (txedit, 1 , 0 , 2 , 2 ); layout->addWidget (button4, 1 , 2 ); layout->addWidget (button5, 2 , 2 ); layout->addWidget (button6, 3 , 0 , 1 , 3 ); window->setLayout (layout); window->show ();
测试代码效果展示: