1. Qt基本结构 1.1 Qt本有项目 1.1.1 项目文件(.pro)
在创建的Qt项目中自动生成了一个后缀为 .pro 的项目文件,该文件中记录着项目的一些属性信息,具体信息如下:
1 2 3 4 5 6 7 8 9 10 11 12 13 14 15 16 17 18 19 20 21 22 23 24 25 26 QT += core gui greaterThan(QT_MAJOR_VERSION, 4): QT += widgets CONFIG += c++11 DEFINES += QT_DEPRECATED_WARNINGS SOURCES += \ main.cpp \ mainwindow.cpp HEADERS += \ mainwindow.h FORMS += \ mainwindow.ui
1.1.2 main.cpp
在这个源文件中有程序的入口函数 main(),介绍下这个文件中自动生成的几行代码:
1 2 3 4 5 6 7 8 9 10 11 12 13 14 15 #include "mainwindow.h" #include <QApplication> int main (int argc, char *argv[]) QApplication a (argc, argv) ; MainWindow w; w.show (); return a.exec (); }
1.1.3 mainwindow.ui
在Qt中每一个窗口都对应一个可编辑的可视化界面(*.ui), 这个界面对应的是一个xml格式的文件,
1 2 3 4 5 6 7 8 9 10 11 12 13 14 15 16 17 18 19 20 21 22 23 24 25 <?xml version="1.0" encoding="UTF-8" ?> <ui version ="4.0" > <class > MainWindow</class > <widget class ="QMainWindow" name ="MainWindow" > <property name ="geometry" > <rect > <x > 0</x > <y > 0</y > <width > 800</width > <height > 600</height > </rect > </property > <property name ="windowTitle" > <string > MainWindow</string > </property > <widget class ="QWidget" name ="centralwidget" /> <widget class ="QMenuBar" name ="menubar" /> <widget class ="QStatusBar" name ="statusbar" /> </widget > <resources /> <connections /> </ui >
1.1.4 mainwindow.h
这个文件是窗口界面对应的类的头文件。
1 2 3 4 5 6 7 8 9 10 11 12 13 14 15 16 17 18 19 20 21 22 #ifndef MAINWINDOW_H #define MAINWINDOW_H #include <QMainWindow> QT_BEGIN_NAMESPACE namespace Ui { class MainWindow ; } QT_END_NAMESPACE class MainWindow : public QMainWindow{ Q_OBJECT public : MainWindow (QWidget *parent = nullptr ); ~MainWindow (); private : Ui::MainWindow *ui; }; #endif
1.1.5 mainwindow.cpp
这个文件是窗口界面对应的类的源文件。
1 2 3 4 5 6 7 8 9 10 11 12 13 14 15 16 #include "mainwindow.h" #include "ui_mainwindow.h" MainWindow::MainWindow (QWidget *parent) : QMainWindow (parent) , ui (new Ui::MainWindow) { ui->setupUi (this ); } MainWindow::~MainWindow () { delete ui; }
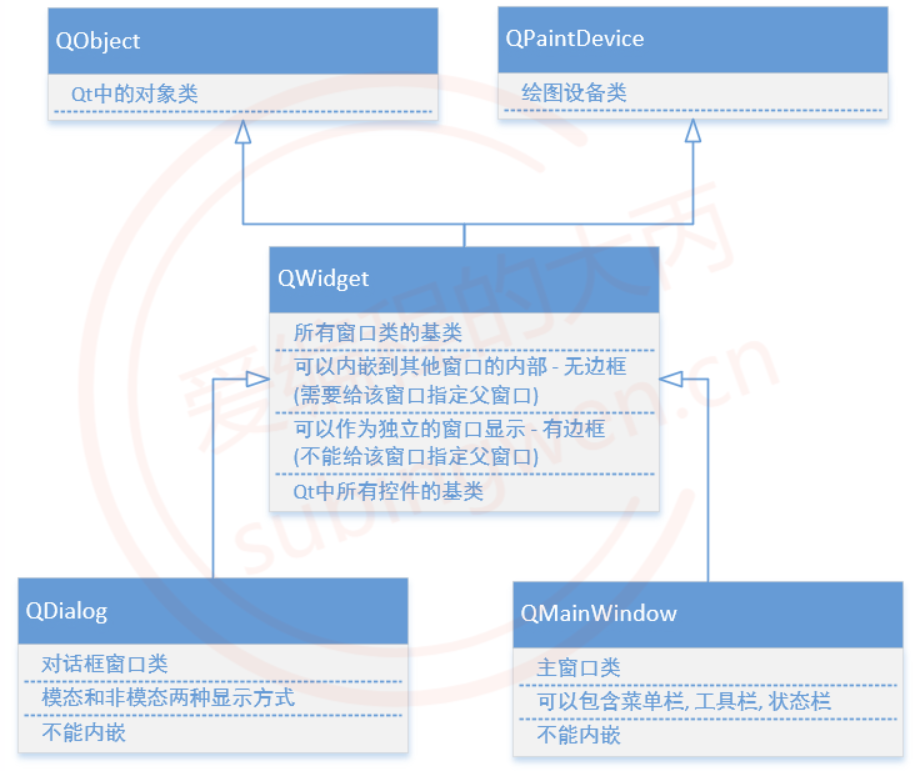
1.2 Qt中的窗口类
在通过Qt向导窗口基于窗口的应用程序的项目过程中倒数第二步选择跟随项目创建的第一个窗口的基类, 下拉菜单有三个选项, 分别为:QMainWindow、QDialog、QWidget如下图:
1.2.1基础窗口类
常用的窗口类有3个
在创建Qt窗口的时候, 需要让自己的窗口类继承上述三个窗口类的其中一个
QWidget
所有窗口类的基类
Qt中的控件(按钮, 输入框, 单选框…)也属于窗口, 基类都是QWidget
可以内嵌到其他窗口中: 没有边框
可以不内嵌单独显示: 独立的窗口, 有边框
QDialog
对话框类, 后边的章节会具体介绍这个窗口
不能内嵌到其他窗口中
QMainWindow
有工具栏, 状态栏, 菜单栏, 后边的章节会具体介绍这个窗口
不能内嵌到其他窗口中
1.2.2 窗口的显示
内嵌窗口
依附于某一个大的窗口, 作为了大窗口的一部分
大窗口就是这个内嵌窗口的父窗口
父窗口显示的时候, 内嵌的窗口也就被显示出来了
不内嵌窗口
这类窗口有边框, 有标题栏
需要调用函数才可以显示
1 2 3 4 5 6 7 void QWidget::show () [virtual slot] int QDialog::exec ()
1.3 内存回收
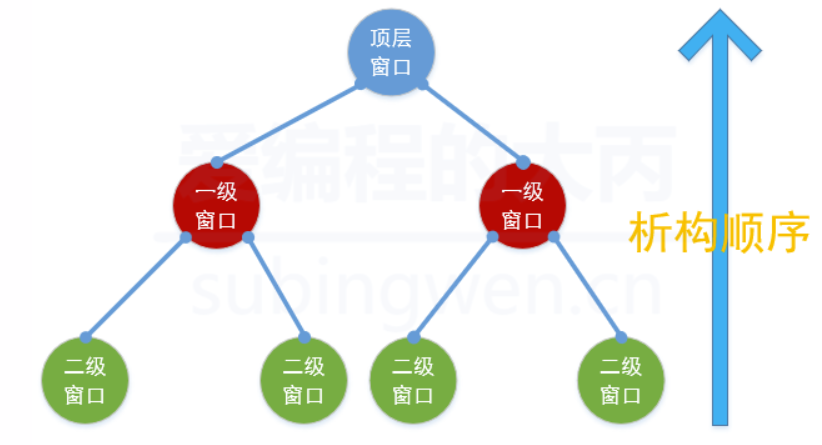
在Qt中创建对象的时候会提供一个 Parent对象指针(可以查看类的构造函数),parent是干什么的?当你创建一个QObject对象时,会看到QObject的构造函数接收一个QObject指针作为参数,这个参数就是parent,也就是父对象指针。这里的父对象并不是继承意义上的父类)
QWidget是能够在屏幕上显示的一切组件的父类。QWidget继承自QObject,因此也继承了这种对象树关系。一个孩子自动地成为父组件的一个子组件。因此,它会显示在父组件的坐标系统中,被父组件的边界剪裁。例如,当用户关闭一个对话框的时候,应用程序将其删除,那么,我们希望属于这个对话框的按钮、图标等应该一起被删除。事实就是如此,因为这些都是对话框的子组件。
当一个QObject对象在堆上创建的时候,Qt会同时为其创建一个对象树。不过,对象树中对象的顺序是没有定义的。这意味着,销毁这些对象的顺序也是未定义的。
任何对象树中的 QObject对象 delete 的时候,如果这个对象有 parent,则自动将其从 parent
综上所述, 我们可以得到一个结论: Qt中有内存回收机制, 但是不是所有被new出的对象被自动回收, 满足条件才可以回收, 如果想要在Qt中实现内存的自动回收, 需要满足以下两个条件:
创建的对象必须是QObject类的子类(间接子类也可以)
QObject类是没有父类的, Qt中有很大一部分类都是从这个类派生出去的
Qt中使用频率很高的窗口类和控件都是 QObject 的直接或间接的子类
其他的类可以自己查阅Qt帮助文档
创建出的类对象, 必须要指定其父对象是谁, 一般情况下有两种操作方式:
1 2 3 4 5 6 7 8 9 QWidget::QWidget (QWidget *parent = Q_NULLPTR, Qt::WindowFlags f = Qt::WindowFlags ()); QTimer::QTimer (QObject *parent = nullptr ); void QWidget::setParent (QWidget *parent) void QObject::setParent (QObject *parent)
2. Qt中的基础数据类型 主要介绍Qt中常用数据类型, 主要内容包括: 基础数据类型, Log日志输出, 字符串类型, QVariant, 位置和尺寸相关类型, 日期和时间相关类型。
2.1 基础类型 因为Qt是一个C++ 框架, 因此C++中所有的语法和数据类型在Qt中都是被支持的, 但是Qt中也定义了一些属于自己的数据类型, 介绍一下这些基础的数类型。
QT基本数据类型定义在#include <QtGlobal> 中,QT基本数据类型有:
类型名称
注释
备注
qint8
signed char
有符号8位数据
qint16
signed short
16位数据类型
qint32
signed short
32位有符号数据类型
qint64
long long int 或 (__int64)
64位有符号数据类型,Windows中定义为__int64
qintptr
qint32 或 qint64
指针类型 根据系统类型不同而不同,32位系统为qint32、64位系统为qint64
qlonglong
long long int 或 (__int64)
Windows中定义为__int64
qptrdiff
qint32 或 qint64
根据系统类型不同而不同,32位系统为qint32、64位系统为qint64
qreal
double 或 float
除非配置了-qreal float选项,否则默认为double
quint8
unsigned char
无符号8位数据类型
quint16
unsigned short
无符号16位数据类型
quint32
unsigned int
无符号32位数据类型
quint64
unsigned long long int 或 (unsigned __int64)
无符号64比特数据类型,Windows中定义为unsigned __int64
quintptr
quint32 或 quint64
根据系统类型不同而不同,32位系统为quint32、64位系统为quint64
qulonglong
unsigned long long int 或 (unsigned __int64)
Windows中定义为__int64
uchar
unsigned char
无符号字符类型
uint
unsigned int
无符号整型
ulong
unsigned long
无符号长整型
ushort
unsigned short
无符号短整型
虽然在Qt中有属于自己的整形或者浮点型, 但是在变成过程中这些一般不用, 常用的类型关键字还是 C/C++中的 int, float, double 等。
2.2 log输出 2.2.1 在调试窗口中输入日志
在Qt中进行log输出, 一般不使用c中的printf, 也不是使用C++中的coutQDebug
1 2 3 4 5 6 7 8 9 10 11 12 13 14 15 qDebug () << "Date:" << QDate::currentDate ();qDebug () << "Types:" << QString ("String" ) << QChar ('x' )<<QRect (0 , 10 , 50 , 40 );qDebug () << "Custom coordinate type:" << coordinate;int number = 666 ;float i = 11.11 ;qWarning () << "Number:" << number << "Other value:" << i;qInfo () << "Number:" << number << "Other value:" << i;qCritical () << "Number:" << number << "Other value:" << i;qDebug () << "我是要成为海贼王的男人!!!" ;qDebug () << "我是隔壁的二柱子..." ;qDebug () << "我是鸣人, 我擅长嘴遁!!!" ;
2.2.2 在终端窗口中输出日志
使用上面的方法只能在项目调试过程中进行日志输出, 如果不是通过IDE进行程序调试, 而是直接执行可执行程序在这种情况下是没有日志输出窗口的,因此也就看不到任何的日志输出。
默认情况下日志信息是不会打印到终端窗口的, 如果想要实现这样的效果, 必须在项目文件中添加相关的属性信息
打开项目文件(*.pro)找到配置项 config, 添加 console 控制台属性:
2.3 字符串类型 在Qt中不仅支持C, C++中的字符串类型, 而且还在框架中定义了专属的字符串类型,
语言类型
字符串类型
C
char*
C++
std::string, char*
Qt
QByteArray, QString
2.3.1 QByteArray
在Qt中QByteArray可以看做是c语言中char*的升级版本。我们在使用这种类型的时候可通过这个类的构造函数申请一块动态内存,用于存储我们需要处理的字符串数据。
构造函数
1 2 3 4 5 6 7 QByteArray::QByteArray (); QByteArray::QByteArray (const char *data, int size = -1 ); QByteArray::QByteArray (int size, char ch);
数据操作
1 2 3 4 5 6 7 8 9 10 11 12 13 14 15 16 17 18 19 20 21 22 23 24 25 26 27 28 QByteArray &QByteArray::append (const QByteArray &ba) ;void QByteArray::push_back (const QByteArray &other) QByteArray &QByteArray::prepend (const QByteArray &ba) ;void QByteArray::push_front (const QByteArray &other) QByteArray &QByteArray::insert (int i, const QByteArray &ba) ;QByteArray &QByteArray::remove (int pos, int len) ;void QByteArray::chop (int n) void QByteArray::truncate (int pos) void QByteArray::clear () QByteArray &QByteArray::replace (const QByteArray &before, const QByteArray &after) ;
子字符串查找和判断
1 2 3 4 5 6 7 8 9 10 11 12 13 14 15 16 17 bool QByteArray::contains (const QByteArray &ba) const bool QByteArray::contains (const char *ba) const bool QByteArray::contains (char ch) const bool QByteArray::startsWith (const QByteArray &ba) const bool QByteArray::startsWith (const char *ba) const bool QByteArray::startsWith (char ch) const bool QByteArray::endsWith (const QByteArray &ba) const bool QByteArray::endsWith (const char *ba) const bool QByteArray::endsWith (char ch) const
遍历
1 2 3 4 5 6 7 8 iterator QByteArray::begin () ;iterator QByteArray::end () ;char QByteArray::at (int i) const char QByteArray::operator [](int i) const ;
查看字节数
1 2 3 4 5 6 7 8 9 10 int QByteArray::length () const int QByteArray::size () const int QByteArray::count () const int QByteArray::count (const QByteArray &ba) const int QByteArray::count (const char *ba) const int QByteArray::count (char ch) const
类型转换
1 2 3 4 5 6 7 8 9 10 11 12 13 14 15 16 17 18 19 20 21 22 23 24 25 26 27 28 29 30 31 char *QByteArray::data () const char *QByteArray::data () const QByteArray &QByteArray::setNum (int n, int base = 10 ) ;QByteArray &QByteArray::setNum (short n, int base = 10 ) ;QByteArray &QByteArray::setNum (qlonglong n, int base = 10 ) ;QByteArray &QByteArray::setNum (float n, char f = 'g' , int prec = 6 ) ;QByteArray &QByteArray::setNum (double n, char f = 'g' , int prec = 6 ) ;[static ] QByteArray QByteArray::number (int n, int base = 10 ) ; [static ] QByteArray QByteArray::number (qlonglong n, int base = 10 ) ; [static ] QByteArray QByteArray::number (double n, char f = 'g' , int prec = 6 ) ; int QByteArray::toInt (bool *ok = Q_NULLPTR, int base = 10 ) const short QByteArray::toShort (bool *ok = Q_NULLPTR, int base = 10 ) const long QByteArray::toLong (bool *ok = Q_NULLPTR, int base = 10 ) const float QByteArray::toFloat (bool *ok = Q_NULLPTR) const double QByteArray::toDouble (bool *ok = Q_NULLPTR) const [static ] QByteArray QByteArray::fromStdString (const std::string &str) ; std::string QByteArray::toStdString () const ;QByteArray QByteArray::toUpper () const ;QByteArray QByteArray::toLower () const ;
2.3.2 QString
QString也是封装了字符串, 但是内部的编码为utf8, UTF-8属于Unicode字符集,它固定使用多个字节(window为2字节, linux为3字节)来表示一个字符,这样可以将世界上几乎所有语言的常用字符收录其中。
构造函数
1 2 3 4 5 6 7 QString::QString (); QString::QString (const char *str); QString::QString (const QByteArray &ba);
数据操作
1 2 3 4 5 6 7 8 9 10 11 12 13 14 15 16 17 18 19 20 21 22 23 24 25 26 27 28 29 30 31 32 33 34 35 36 QString &QString::append (const QString &str) ;QString &QString::append (const char *str) ;QString &QString::append (const QByteArray &ba) ;void QString::push_back (const QString &other) QString &QString::prepend (const QString &str) ;QString &QString::prepend (const char *str) ;QString &QString::prepend (const QByteArray &ba) ;void QString::push_front (const QString &other) QString &QString::insert (int position, const QString &str) ;QString &QString::insert (int position, const char *str) ;QString &QString::insert (int position, const QByteArray &str) ;QString &QString::remove (int position, int n) ;void QString::chop (int n) void QString::truncate (int position) void QString::clear () QString &QString::replace (const QString &before, const QString &after, Qt::CaseSensitivity cs = Qt::CaseSensitive) ;
子字符串查找和判断
1 2 3 4 5 6 7 8 9 10 11 bool QString::contains (const QString &str, Qt::CaseSensitivity cs = Qt::CaseSensitive) const bool QString::startsWith (const QString &s, Qt::CaseSensitivity cs = Qt::CaseSensitive) const bool QString::endsWith (const QString &s, Qt::CaseSensitivity cs = Qt::CaseSensitive) const
遍历
1 2 3 4 5 6 7 8 iterator QString::begin () ;iterator QString::end () ;const QChar QString::at (int position) const const QChar QString::operator [](int position) const
查看字节数
1 2 3 4 5 6 7 8 int QString::length () const int QString::size () const int QString::count () const int QString::count (const QStringRef &str, Qt::CaseSensitivity cs = Qt::CaseSensitive) const
类型转换
1 2 3 4 5 6 7 8 9 10 11 12 13 14 15 16 17 18 19 20 21 22 23 24 25 26 27 28 29 30 31 32 33 34 35 QString &QString::setNum (int n, int base = 10 ) ;QString &QString::setNum (short n, int base = 10 ) ;QString &QString::setNum (long n, int base = 10 ) ;QString &QString::setNum (float n, char format = 'g' , int precision = 6 ) ;QString &QString::setNum (double n, char format = 'g' , int precision = 6 ) ;[static ] QString QString::number (long n, int base = 10 ) ; [static ] QString QString::number (int n, int base = 10 ) ; [static ] QString QString::number (double n, char format = 'g' , int precision = 6 ) ; int QString::toInt (bool *ok = Q_NULLPTR, int base = 10 ) const short QString::toShort (bool *ok = Q_NULLPTR, int base = 10 ) const long QString::toLong (bool *ok = Q_NULLPTR, int base = 10 ) const float QString::toFloat (bool *ok = Q_NULLPTR) const double QString::toDouble (bool *ok = Q_NULLPTR) const [static ] QString QString::fromStdString (const std::string &str) ; std::string QString::toStdString () const ;QByteArray QString::toLocal8Bit () const ;QByteArray QString::toLatin1 () const ;QByteArray QString::toUtf8 () const ;QString QString::toUpper () const ;QString QString::toLower () const ;
字符串格式
1 2 3 4 5 6 7 8 9 10 11 12 13 14 15 QString QString::arg (const QString &a, int fieldWidth = 0 , QChar fillChar = QLatin1Char( ' ' )) const QString QString::arg (int a, int fieldWidth = 0 , int base = 10 , QChar fillChar = QLatin1Char( ' ' )) const int i; int total; QString fileName; QString status = QString ("Processing file %1 of %2: %3" ) .arg (i).arg (total).arg (fileName);
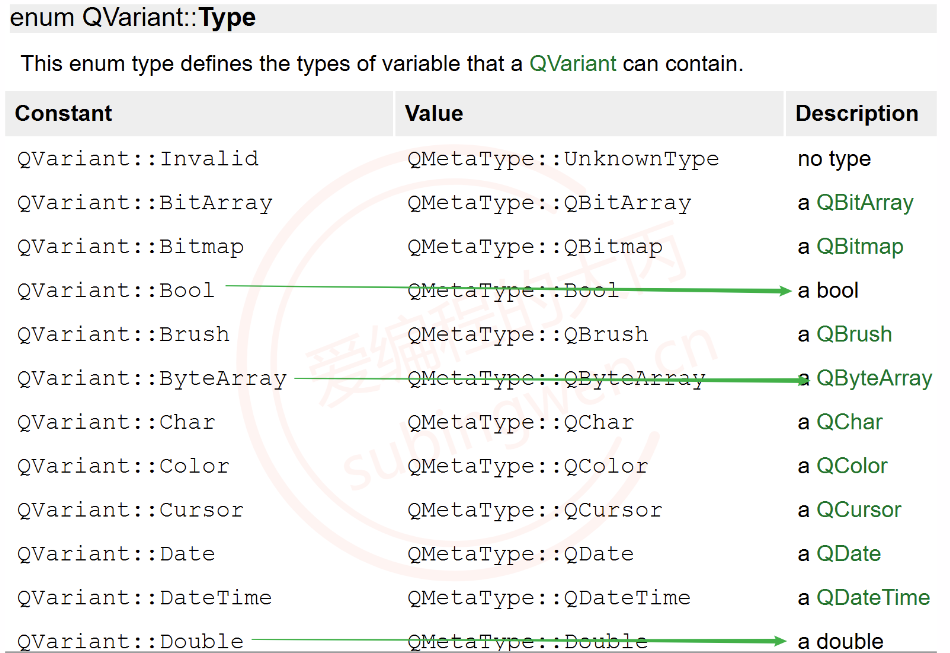
2.4 QVariant
QVariant这个类很神奇,或者说方便。很多时候,需要几种不同的数据类型需要传递,如果用结构体,又不大方便,容器保存的也只是一种数据类型,而QVariant则可以统统搞定。QBrush、QColor、QCursor、QDateTime、QFont、QKeySequence、QPalette、QPen、QPixmap、QPoint、QRect、QRegion、QSize和QString,并且还有C++基本类型,如int、float等。
2.4.1 标准类型
1 2 3 4 5 6 7 8 9 10 11 12 13 14 15 16 17 18 19 20 21 22 23 24 QVariant::QVariant (int val); QVariant::QVariant (bool val); QVariant::QVariant (double val); QVariant::QVariant (const char *val); QVariant::QVariant (const QByteArray &val); QVariant::QVariant (const QString &val); ...... void QVariant::setValue (const T &value) [static ] QVariant QVariant::fromValue (const T &value) ; #if 1 QVariant v; v.setValue (5 ); #else QVariant v = QVariant::fromValue (5 ); #endif int i = v.toInt (); QString s = v.toString ();
1 2 Type QVariant::type () const ;
返回值Type的部分枚举定义, 全部信息可查阅Qt帮助文档
1 2 3 4 5 6 7 8 9 bool QVariant::toBool () const QByteArray QVariant::toByteArray () const ;double QVariant::toDouble (bool *ok = Q_NULLPTR) const float QVariant::toFloat (bool *ok = Q_NULLPTR) const int QVariant::toInt (bool *ok = Q_NULLPTR) const QString QVariant::toString () const ;......
2.4.2 自定义类型
除标准类型, 自定义的类型也可以使用QVariant类进行封装,被QVariant存储的数据类型需有一个默认的构造函数和一个拷贝构造函数。为实现此功能,首先必须使用Q_DECLARE_METATYPE()宏。Q_DECLARE_METATYPE(Type)
使用步骤如下:
1 2 3 4 5 6 7 8 struct MyTest { int id; QString name; }; Q_DECLARE_METATYPE (MyTest)
1
2
3
4
5
6
7
8
9
10
11
12
MyTest t; t.name = "张三丰" ; t.num = 666 ; QVariant vt = QVariant::fromValue (t); if (vt.canConvert <MyTest>()){ MyTest t = vt.value <MyTest>(); qDebug () << "name: " << t.name << ", num: " << t.num; }
以上操作用到的QVariant类的API如下:
1 2 3 4 bool QVariant::canConvert () const T QVariant::value () const ;
2.5 位置和尺寸 2.5.1 QPoint
QPoint类封装了我们常用用到的坐标点 (x, y), 常用的 API如下:
1 2 3 4 5 6 7 8 9 10 11 12 13 14 15 16 17 18 19 20 21 22 23 24 25 26 27 QPoint::QPoint (); QPoint::QPoint (int xpos, int ypos); void QPoint::setX (int x) void QPoint::setY (int y) int QPoint::x () const int &QPoint::rx () int QPoint::y () const int &QPoint::ry () QPoint &QPoint::operator *=(float factor); QPoint &QPoint::operator *=(double factor); QPoint &QPoint::operator *=(int factor); QPoint &QPoint::operator +=(const QPoint &point); QPoint &QPoint::operator -=(const QPoint &point); QPoint &QPoint::operator /=(qreal divisor);
2.5.2 QLine
QLine是一个直线类, 封装了两个坐标点 (两点确定一条直线)
常用API如下:
1 2 3 4 5 6 7 8 9 10 11 12 13 14 15 16 17 18 19 20 21 22 23 24 25 26 27 28 29 30 31 32 33 34 35 36 37 38 39 40 41 42 43 QLine::QLine (); QLine::QLine (const QPoint &p1, const QPoint &p2); QLine::QLine (int x1, int y1, int x2, int y2); void QLine::setPoints (const QPoint &p1, const QPoint &p2) void QLine::setLine (int x1, int y1, int x2, int y2) void QLine::setP1 (const QPoint &p1) void QLine::setP2 (const QPoint &p2) QPoint QLine::p1 () const ;QPoint QLine::p2 () const ;QPoint QLine::center () const ;int QLine::x1 () const int QLine::x2 () const int QLine::y1 () const int QLine::y2 () const void QLine::translate (const QPoint &offset) void QLine::translate (int dx, int dy) QLine QLine::translated (const QPoint &offset) const ;QLine QLine::translated (int dx, int dy) const ;bool QLine::operator !=(const QLine &line) const ;bool QLine::operator ==(const QLine &line) const ;
2.5.3 QSize
在QT中QSize类用来形容长度和宽度
1 2 3 4 5 6 7 8 9 10 11 12 13 14 15 16 17 18 19 20 21 22 23 24 25 26 27 28 29 30 QSize::QSize (); QSize::QSize (int width, int height); void QSize::setWidth (int width) void QSize::setHeight (int height) int QSize::width () const int &QSize::rwidth () int QSize::height () const int &QSize::rheight () void QSize::transpose () QSize QSize::transposed () const ;QSize &QSize::operator *=(qreal factor); QSize &QSize::operator +=(const QSize &size); QSize &QSize::operator -=(const QSize &size); QSize &QSize::operator /=(qreal divisor);
2.5.4 QRect
在Qt中使用 QRect类来描述一个矩形
1 2 3 4 5 6 7 8 9 10 11 12 13 14 15 16 17 18 19 20 21 22 23 24 25 26 27 28 29 30 31 32 33 34 35 36 37 38 39 40 41 42 43 44 45 46 47 48 49 50 QRect::QRect (); QRect::QRect (const QPoint &topLeft, const QPoint &bottomRight); QRect::QRect (const QPoint &topLeft, const QSize &size); QRect::QRect (int x, int y, int width, int height); void QRect::setSize (const QSize &size) void QRect::setRect (int x, int y, int width, int height) void QRect::setWidth (int width) void QRect::setHeight (int height) QPoint QRect::topLeft () const ;QPoint QRect::topRight () const ;QPoint QRect::bottomLeft () const ;QPoint QRect::bottomRight () const ;QPoint QRect::center () const ;int QRect::top () const int QRect::y () const int QRect::bottom () const int QRect::x () const int QRect::left () const int QRect::right () const int QRect::width () const int QRect::height () const QSize QRect::size () const ;
2.6 日期和时间 2.6.1 QDate
QDate类可以封装日期信息也可以通过这个类得到日期相关的信息, 包括:年, 月, 日。
1 2 3 4 5 6 7 8 9 10 11 12 13 14 15 16 17 18 19 20 21 22 23 24 25 26 27 28 29 30 31 32 33 34 35 36 37 38 39 40 41 42 43 44 45 QDate::QDate (); QDate::QDate (int y, int m, int d); bool QDate::setDate (int year, int month, int day) QDate QDate::addDays (qint64 ndays) const ;QDate QDate::addMonths (int nmonths) const ;QDate QDate::addYears (int nyears) const ;int QDate::year () const int QDate::month () const int QDate::day () const void QDate::getDate (int *year, int *month, int *day) const QString QDate::toString (const QString &format) const ;bool QDate::operator !=(const QDate &d) const ;bool QDate::operator <(const QDate &d) const ;bool QDate::operator <=(const QDate &d) const ;bool QDate::operator ==(const QDate &d) const ;bool QDate::operator >(const QDate &d) const ;bool QDate::operator >=(const QDate &d) const ;[static ] QDate QDate::currentDate () ;
2.6.2 QTime
QTime类可以封装时间信息也可以通过这个类得到时间相关的信息, 包括:时, 分, 秒, 毫秒。
1 2 3 4 5 6 7 8 9 10 11 12 13 14 15 16 17 18 19 20 21 22 23 24 25 26 27 28 29 30 31 32 33 34 35 36 37 38 39 40 41 42 43 44 45 46 47 48 49 50 51 52 53 54 55 56 57 58 59 60 61 62 63 64 65 66 67 68 69 70 71 72 73 74 75 76 77 78 79 80 81 82 QTime::QTime (); QTime::QTime (int h, int m, int s = 0 , int ms = 0 ); bool QTime::setHMS (int h, int m, int s, int ms = 0 ) QTime QTime::addSecs (int s) const ;QTime QTime::addMSecs (int ms) const ; QTime n (14 , 0 , 0 ) ; QTime t; t = n.addSecs (70 ); t = n.addSecs (-70 ); t = n.addSecs (10 * 60 * 60 + 5 ); t = n.addSecs (-15 * 60 * 60 ); int QTime::hour () const int QTime::minute () const int QTime::second () const int QTime::msec () const QString QTime::toString (const QString &format) const ;void QTime::start () int QTime::elapsed () const int QTime::restart () void QElapsedTimer::start () qint64 QElapsedTimer::restart () ;qint64 QElapsedTimer::elapsed () const ;bool QTime::operator !=(const QTime &t) const ;bool QTime::operator <(const QTime &t) const ;bool QTime::operator <=(const QTime &t) const ;bool QTime::operator ==(const QTime &t) const ;bool QTime::operator >(const QTime &t) const ;bool QTime::operator >=(const QTime &t) const ;[static ] QTime QTime::currentTime () ;
2.6.3 QDateTime
QDateTime类可以封装日期和时间信息也可以通过这个类得到日期和时间相关的信息, 包括:年, 月, 日, 时, 分, 秒,毫秒。QDate 和 QTime 这两个类的结合体。
1 2 3 4 5 6 7 8 9 10 11 12 13 14 15 16 17 18 19 20 21 22 23 24 25 26 27 28 29 30 31 32 33 34 35 36 QDateTime::QDateTime (); QDateTime::QDateTime (const QDate &date, const QTime &time, Qt::TimeSpec spec = Qt::LocalTime); void QDateTime::setDate (const QDate &date) void QDateTime::setTime (const QTime &time) QDateTime QDateTime::addYears (int nyears) const ;QDateTime QDateTime::addMonths (int nmonths) const ;QDateTime QDateTime::addDays (qint64 ndays) const ;QDateTime QDateTime::addSecs (qint64 s) const ;QDateTime QDateTime::addMSecs (qint64 msecs) const ;QDate QDateTime::date () const ;QTime QDateTime::time () const ;QString QDateTime::toString (const QString &format) const ;bool QDateTime::operator !=(const QDateTime &other) const ;bool QDateTime::operator <(const QDateTime &other) const ;bool QDateTime::operator <=(const QDateTime &other) const ;bool QDateTime::operator ==(const QDateTime &other) const ;bool QDateTime::operator >(const QDateTime &other) const ;bool QDateTime::operator >=(const QDateTime &other) const ;[static ] QDateTime QDateTime::currentDateTime () ;
2.6.4 定时器类QTimer 在进行窗口程序的处理过程中, 经常要周期性的执行某些操作, 或者制作一些动画效果,看似比较复杂的问题使用定时器就可以完美的解决这些问题QTimer 的使用方法。
要使用它,只需创建一个QTimer类对象,然后调用其 start() 函数开启定时器,此后QTimer对象就会周期性的发出 timeout() 信号。我们先来了解一下这个类的相关API。
2.6.4.1 public/slot function 1 2 3 4 5 6 7 8 9 10 11 12 13 14 15 16 17 18 19 20 21 22 23 24 25 26 27 28 29 30 31 32 33 34 QTimer::QTimer (QObject *parent = nullptr ); void QTimer::setInterval (int msec) int QTimer::interval () const [slot] void QTimer::start () [slot] void QTimer::start (int msec) [slot] void QTimer::stop () void QTimer::setTimerType (Qt::TimerType atype) Qt::TimerType QTimer::timerType () const ; bool QTimer::isActive () const bool QTimer::isSingleShot () const void QTimer::setSingleShot (bool singleShot)
2.6.4.2 signals 这个类的信号只有一个, 当定时器超时时,该信号就会被发射出来。conect()关联一个槽函数, 就可以在槽函数中处理超时事件了。
1 [signal] void QTimer::timeout ()
2.6.4.3 static public function 1 2 3 4 5 6 7 8 9 10 11 [static ] void QTimer::singleShot ( int msec, const QObject *receiver, PointerToMemberFunction method)
2.6.4.4 定时器使用举例
1 2 3 4 5 6 7 8 9 10 11 12 13 14 15 16 17 18 19 20 21 22 23 24 25 26 27 28 29 30 31 QTimer* timer = new QTimer (this ); timer->setTimerType (Qt::PreciseTimer); connect (ui->loopBtn, &QPushButton::clicked, this , [=](){ if (timer->isActive ()) { timer->stop (); ui->loopBtn->setText ("开始" ); } else { ui->loopBtn->setText ("关闭" ); timer->start (1000 ); } }); connect (timer, &QTimer::timeout, this , [=](){ QTime tm = QTime::currentTime (); QString tmstr = tm.toString ("hh:mm:ss.zzz" ); ui->curTime->setText (tmstr); });
1 2 3 4 5 6 7 8 9 10 11 12 13 connect (ui->onceBtn, &QPushButton::clicked, this , [=](){ QTimer::singleShot (2000 , this , [=](){ QTime tm = QTime::currentTime (); QString tmstr = tm.toString ("hh:mm:ss.zzz" ); ui->onceTime->setText (tmstr); }); });
3. 信号槽 介绍Qt中的信号槽, 主要内容包括: 信号槽的本质, 信号槽的关系, 标准信号槽的使用, 自定义信号槽的使用, 信号槽的拓展 。
3.1 信号和槽概述
信号槽是 Qt框架引以为豪的机制之一。所谓信号槽,实际就是观察者模式(发布-订阅模式)。事件发生之后,比如,按钮检测到自己被点击了一下,它就会发出一个信号(signal)。这种发出是没有目的的,类似广播。
3.1.1 信号的本质
信号是由于用户对窗口或控件进行了某些操作,导致窗口或控件产生了某个特定事件,这时候Qt对应的窗口类会发出某个信号,以此对用户的挑选做出反应。
因此根据上述的描述我们得到一个结论 – 信号的本质就是事件,比如:
按钮单击、双击
窗口刷新
鼠标移动、鼠标按下、鼠标释放
键盘输入
那么在Qt中信号是通过什么形式呈现给使用者的呢?
我们对哪个窗口进行操作, 哪个窗口就可以捕捉到这些被触发的事件。
对于使用者来说触发了一个事件我们就可以得到Qt框架给我们发出的某个特定信号。
信号的呈现形式就是函数, 也就是说某个事件产生了, Qt框架就会调用某个对应的信号函数, 通知使用者。
在QT中信号的发出者是某个实例化的类对象,对象内部可以进行相关事件的检测。
3.1.2 槽的本质 在Qt中槽函数是一类特殊的功能的函数,在编码过程中也可以作为类的普通成员函数来使用。
在Qt中槽函数的所有者也是某个类的实例对象。
3.1.3 信号和槽的关系 在Qt中信号和槽函数都是独立的个体,本身没有任何联系,但是由于某种特性需求我们可以将二者连接到一起。在Qt中我们需要使用QOjbect类中的connect函数进二者的关联。
连接信号和槽的connect()函数原型如下, 其中PointerToMemberFunction是一个指向函数地址的指针
1
2
3
4
5
6
7
8
9
10
11
12
13
14
15
QMetaObject::Connection QObject::connect ( const QObject *sender, PointerToMemberFunction signal, const QObject *receiver, PointerToMemberFunction method, Qt::ConnectionType type = Qt::AutoConnection) 参数: - sender: 发出信号的对象 - signal: 属于sender对象, 信号是一个函数, 这个参数的类型是函数 指针, 信号函数地址 - receiver: 信号接收者 - method: 属于receiver对象, 当检测到sender发出了signal信号, receiver对象调用method方法,信号发出之后的处理动作 connect (const QObject *sender, &QObject::signal, const QObject *receiver, &QObject::method);
使用connect()进行信号槽连接的注意事项:
connect函数相对于做了信号处理动作的注册
调用conenct函数的sender对象的信号并没有产生, 因此receiver对象的method也不会被调用
method槽函数本质是一个回调函数, 调用的时机是信号产生之后, 调用是Qt框架来执行的
connect中的sender和recever两个指针必须被实例化了, 否则conenct不会成功
3.2 标准信号槽使用 3.2.1 标准信号/槽
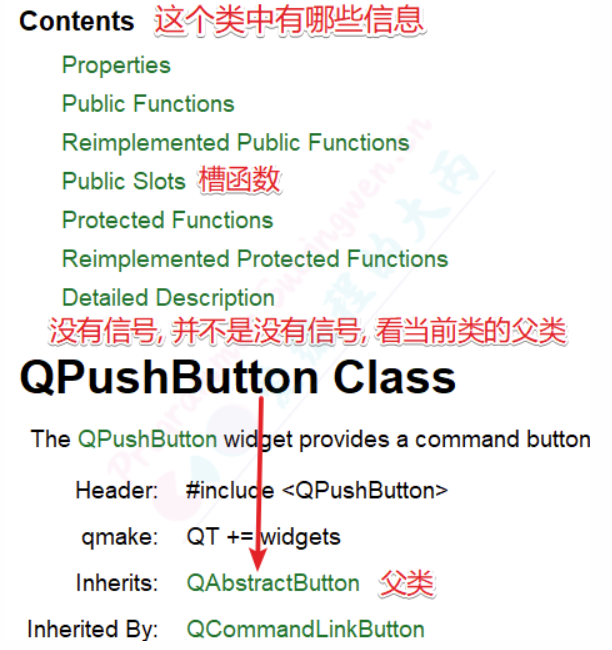
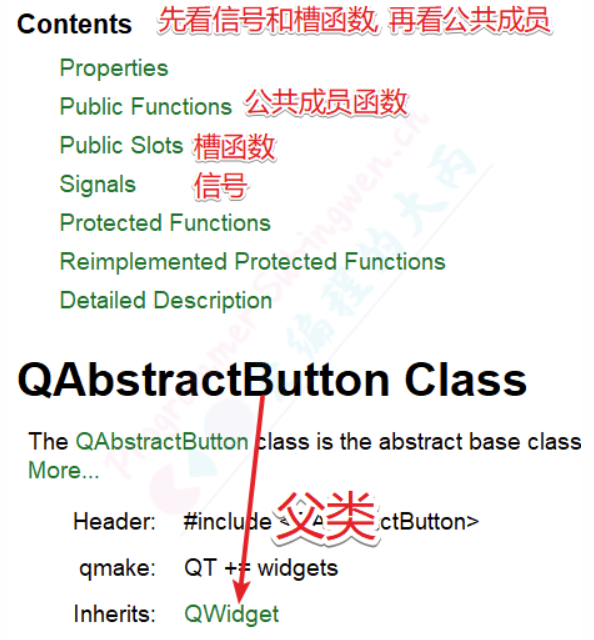
在Qt提供的很多标准类中都可以对用户触发的某些特定事件进行检测, 因此当用户做了这些操作之后, 事件被触发类的内部就会产生对应的信号,这些信号都是Qt类内部自带的, 因此称之为标准信号。QPushButtonContents中寻找关键字signals,信号的意思,但是我们发现并没有找到,这时候我们应该看当前类从父类继承下来了哪些信号
因此我们去他的父类QAbstractButton中就可以找到该关键字,点击signals索引到系统自带的信号有如下几个
3.2.2 使用
掌握标准信号、槽的查找方式之后以及connect()函数的作用之后, 一个简单的例子了解使用方式。
1
2
3
4
功能实现: 点击窗口上的按钮, 关闭窗口 功能分析: - 按钮: 信号发出者 -> QPushButton 类型 - 窗口: 信号的接收者和处理者 -> QWidget 类型
需要使用的标准信号槽函数
1 2 3 4 [signal] void QAbstractButton::clicked (bool checked = false ) [slot] bool QWidget::close () ;
对于上边的需求只需要一句代码, 只需要写一句代码就能实现了
1 2 connect (ui->closewindow, &QPushButton::clicked, this , &MainWindow::close);
connect()操作一般写在窗口的构造函数中, 相当于在事件产生之前在qt框架中先进行注册, 这样在程序运行过程中假设产生了按钮的点击事件, 框架就会调用信号接收者对象对应的槽函数了, 如果信号不产生, 槽函数也就一直不会被调用。
3.3 自定义信号槽使用
Qt框架提供的信号槽在某些特定场景下是无法满足我们的项目需求的,因此我们还设计自己需要的的信号和槽,同样还是使用connect()对自定义的信号槽进行连接。
如果想要在QT类中自定义信号槽, 需要满足一些条件, 并且有些事项也需要注意:
要编写新的类并且让其继承Qt的某些标准类
这个新的子类必须从QObject类或者是QObject子类进行派生
在定义类的头文件中加入 Q_OBJECT 宏
1 2 3 4 5 6 class MyMainWindow : public QWidget{ Q_OBJECT ...... }
3.3.1 自定义信号
在Qt中信号的本质是事件, 但是在框架中也是以函数的形式存在的, 只不过信号对应的函数只有声明,没有定义。如果Qt中的标准信号不能满足我们的需求,可以在程序中进行信号的自定义,当自定义信号对应的事件产生之后,认为的将这个信号发射出去即可(其实就是调用一下这个信号函数)。
下边给大家阐述一下, 自定义信号的要求和注意事项:
信号是类的成员函数
返回值必须是 void 类型
信号的名字可以根据实际情况进行指定
参数可以随意指定, 信号也支持重载
信号需要使用 signals 关键字进行声明, 使用方法类似于public等关键字
信号函数只需要声明, 不需要定义(没有函数体实现)
在程序中发射自定义信号: 发送信号的本质就是调用信号函数
习惯性在信号函数前加关键字: emit, 但是可以省略不写
emit只是显示的声明一下信号要被发射了, 没有特殊含义
底层 emit == #define emit
1 2 3 4 5 6 7 8 9 10 11 class Test : public QObject{ Q_OBJECT signals: void testsignal () void testsignal (int a) };
3.3.2 自定义槽
槽函数就是信号的处理动作,在Qt中槽函数可以作为普通的成员函数来使用。如果标准槽函数提供的功能满足不了需求,可以自己定义槽函数进行某些特殊功能的实现。自定义槽函数和自定义的普通函数写法是一样的。
下边给大家阐述一下, 自定义槽的要求和注意事项:
返回值必须是 void 类型
槽也是函数, 因此也支持重载
槽函数需要指定多少个参数, 需要看连接的信号的参数个数
槽函数的参数是用来接收信号传递的数据的, 信号传递的数据就是信号的参数
举例:
信号函数: void testsig(int a, double b);
槽函数: void testslot(int a, double b);
总结:
槽函数的参数应该和对应的信号的参数个数, 从左到右类型依次对应
信号的参数可以大于等于槽函数的参数个数 == 信号传递的数据被忽略了
信号函数: void testsig(int a, double b);
槽函数: void testslot(int a);
Qt中槽函数的类型是多样的
槽函数可以使用关键字进行声明: slots (Qt5中slots可以省略不写)
public slots:
private slots: –> 这样的槽函数不能在类外部被调用
protected slots: –> 这样的槽函数不能在类外部被调用
1 2 3 4 5 6 7 8 9 10 11 class Test : public QObject{ public : void testSlot () static void testFunc () public slots: void testSlot (int id) };
根据特定场景自定义信号槽:
1 2 3 4 5 6 7 8 9 10 11 12 13 14 15 16 17 18 19 20 21 22 23 24 class GirlFriend : public QObject{ Q_OBJECT public : explicit GirlFriend (QObject *parent = nullptr ) signals: void hungry () void hungry (QString msg) }; class Me : public QObject{ Q_OBJECT public : explicit Me (QObject *parent = nullptr ) public slots: void eatMeal () void eatMeal (QString msg) };
3.4 信号槽拓展 3.4.1 信号槽使用拓展
一个信号可以连接多个槽函数, 发送一个信号有多个处理动作
需要写多个connect()连接
槽函数的执行顺序是随机的, 和connect函数的调用顺序没有关系
信号的接收者可以是一个对象, 也可以是多个对象
一个槽函数可以连接多个信号, 多个不同的信号, 处理动作是相同的
信号可以连接信号
信号接收者可不处理接收的信号, 而是继续发射新的信号,这相当于传递了数据, 并没有对数据进行处理
1
2
connect (const QObject *sender, &QObject::signal, const QObject *receiver, &QObject::siganl-new );
1
2
disconnect (const QObject *sender, &QObject::signal, const QObject *receiver, &QObject::method);
3.4.2 信号槽的连接方式
1 2 3 4 5 6 7 8 9 QMetaObject::Connection QObject::connect ( const QObject *sender, PointerToMemberFunction signal, const QObject *receiver, PointerToMemberFunction method, Qt::ConnectionType type = Qt::AutoConnection) connect (const QObject *sender, &QObject::signal, const QObject *receiver, &QObject::method);
这种旧的信号槽连接方式在Qt5中是支持的, 但是不推荐使用, 因为这种方式在进行信号槽连接的时候,信号槽函数通过宏SIGNAL和SLOT转换为字符串类型。
1 2 3 4 5 6 7 8 [static ] QMetaObject::Connection QObject::connect ( const QObject *sender, const char *signal, const QObject *receiver, const char *method, Qt::ConnectionType type = Qt::AutoConnection) connect (const QObject *sender,SIGNAL (信号函数名(参数1 , 参数2 , ...)), const QObject *receiver,SLOT (槽函数名(参数1 , 参数2 , ...)));
Qt4中声明槽函数必须要使用 slots 关键字, 不能省略。
场景描述:
分析:
先定义出一个Qt的类。
1
2
3
4
5
6
7
8
9
10
11
12
13
14
15
16
17
18
19
20
21
22
class Me : public QObject{ Q_OBJECT public slots: void eat () void eat (QString somthing) signals: void hungury () void hungury (QString somthing) }; Me m; connect (&m, SIGNAL (eat ()), &m, SLOT (hungury ()));connect (&m, SIGNAL (eat (QString)), &m, SLOT (hungury (QString)));connect (&m, &Me::eat, &m, &Me::hungury);
Qt5处理方式错误原因分析:
上边的写法之所以错误是因为这个类中信号槽都是重载过的, 信号和槽都是通过函数名去关联函数的地址, 但是这个同名函数对应两块不同的地址, 一个带参, 一个不带参, 因此编译器就不知道去关联哪块地址了, 所以如果我们在这种时候通过以上方式进行信号槽连接, 编译器就会报错。
解决方案:
可以通过定义函数指针的方式指定出函数的具体参数,这样就可以确定函数的具体地址了。
定义函数指针指向重载的某个信号或者槽函数,在connect()函数中将函数指针名字作为实参就可以了。
1 2 3 void (Me::*func1)(QString) = &Me::eat; void (Me::*func2)() = &Me::hungury;
Qt正确的处理方式:
1 2 3 4 5 6 void (Me::*mysignal)(QString) = &Me::eat;void (Me::*myslot)(QString) = &Me::hungury;connect (&m, mysignal, &m, myslot);
总结
Qt4的信号槽连接方式因为使用了宏函数, 宏函数对用户传递的信号槽不会做错误检测, 容易出bug
Qt5的信号槽连接方式, 传递的是信号槽函数的地址, 编译器会做错误检测, 减少了bug的产生
当信号槽函数被重载之后, Qt4的信号槽连接方式不受影响
当信号槽函数被重载之后, Qt5中需要给被重载的信号或者槽定义函数指针